AutoCAD on Windows 11: Troubleshooting Guide and Solutions for Common Issues
Upgrading to a new operating system like Windows 11 can bring a host of benefits, including enhanced security features, improved performance, and a modern user interface. However, it is not uncommon for users to encounter compatibility issues with certain applications after a major OS upgrade. One such application that some users have reported experiencing problems with is AutoCAD. This powerful design and drafting software, widely used by architects, engineers, and designers, may sometimes exhibit unexpected behavior or fail to function correctly on Windows 11.
Common Issues After Windows Upgrade
After upgrading to Windows 11, some AutoCAD users have reported various issues ranging from minor glitches to complete software failure. These problems can significantly disrupt workflows and hinder productivity. Understanding the common issues is the first step towards effective troubleshooting. Often, these issues stem from compatibility conflicts between the older software version and the newer operating system environment. In some instances, core components required by AutoCAD, such as specific versions of the .NET Framework, may not be correctly configured or enabled after the upgrade.
One prevalent issue is the inability to launch AutoCAD after the Windows 11 upgrade. Users might click on the AutoCAD icon, but the program either fails to start, gets stuck on the splash screen, or crashes shortly after launch. Another common problem is performance degradation, where AutoCAD becomes sluggish and unresponsive, even when working with relatively simple drawings. Furthermore, certain features or functionalities within AutoCAD might malfunction, leading to errors or unexpected results during design and drafting tasks. These issues can be frustrating and require systematic troubleshooting to identify and resolve the underlying causes.
Troubleshooting Steps
When AutoCAD encounters problems on Windows 11, a systematic approach to troubleshooting is crucial. By following a series of steps, you can pinpoint the source of the issue and apply the appropriate solutions. These steps range from simple fixes like reinstalling the software to more advanced procedures such as modifying the Windows Registry. It is always recommended to start with the basic solutions and progressively move towards more complex ones as needed.
1. Reinstall AutoCAD
The first and often simplest solution to try when AutoCAD is not working correctly after a Windows 11 upgrade is to reinstall the software. The upgrade process itself might sometimes lead to file corruption or configuration errors within the AutoCAD installation. Reinstalling AutoCAD ensures a fresh and clean installation, replacing any potentially corrupted files and resetting configurations to their default states.
To reinstall AutoCAD, first, you should completely uninstall the existing version from your system. This can be done through the “Programs and Features” control panel in Windows. After uninstalling, it is advisable to restart your computer. Once restarted, download the latest compatible version of AutoCAD from the official Autodesk website or your authorized source. Follow the on-screen instructions to complete the installation process. After reinstalling, launch AutoCAD to check if the issue is resolved. This straightforward step often resolves problems related to installation corruption and is a good starting point for troubleshooting.
2. Check .NET Framework Installation
AutoCAD relies heavily on the Microsoft .NET Framework to function correctly. Specifically, it requires .NET Framework 4.x or a later version. Windows 11 typically comes with a compatible version of the .NET Framework pre-installed. However, it’s essential to verify that it is properly installed and enabled. Sometimes, the .NET Framework installation might be corrupted or disabled during the Windows upgrade process, leading to AutoCAD malfunctions.
To check the .NET Framework installation, navigate to “Control Panel” and then select “Programs and Features.” In the left sidebar, click on “Turn Windows features on or off.” This will open a window listing various Windows features. Look for “.NET Framework 4.x Advanced Services” (the exact version number may vary depending on your Windows 11 build). Ensure that the checkbox next to it is selected, indicating that it is enabled. If the box is not checked, check it and click “OK.” Windows might require you to download and install the .NET Framework if it’s not already present or fully installed. After enabling or installing, restart your computer and then try launching AutoCAD again. A properly installed and enabled .NET Framework is crucial for AutoCAD’s operation.
If you suspect that the .NET Framework installation is corrupted, Microsoft provides a dedicated repair tool. You can search for “Microsoft .NET Framework Repair Tool” online and download it from the official Microsoft website. Run the tool, and it will automatically detect and attempt to repair any issues with your .NET Framework installation. After running the repair tool, restart your system and check if AutoCAD now works as expected.
3. Registry Edit for .NET Framework Version
In some scenarios, even if the .NET Framework is correctly installed, AutoCAD might still fail to launch or function properly. This can occur if AutoCAD is specifically looking for an older version of the .NET Framework during its startup process. While Windows 11 includes newer versions that are generally backward-compatible, subtle differences might sometimes cause issues. A workaround to address this is to “fool” AutoCAD into believing that the required older version of .NET Framework is present by modifying the Windows Registry.
Caution: Modifying the Windows Registry incorrectly can lead to serious system instability and may require you to reinstall Windows. Therefore, it is absolutely crucial to back up your Registry before making any changes. Also, create a system restore point so you can easily revert your system to a previous state if anything goes wrong.
3.1. Back up Registry
Before making any changes to the Registry, creating a backup is paramount. To back up the Registry, type “regedit” in the Windows search bar and press Enter to open the Registry Editor. In the Registry Editor window, go to “File” and then select “Export.” Choose a location to save the backup file, give it a descriptive name (e.g., “RegistryBackup_BeforeAutoCADFix”), and ensure that “Export range” is set to “All.” Click “Save.” This will create a complete backup of your Registry that you can restore if needed.
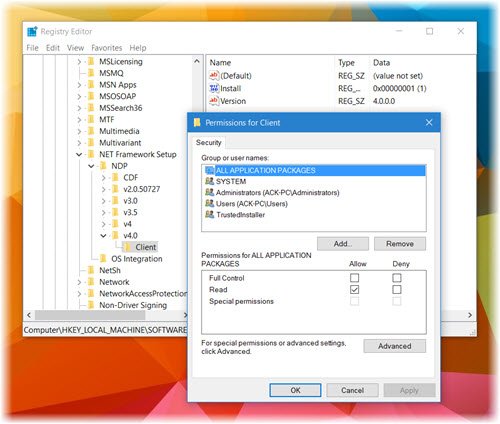
3.2. Take Ownership of Registry Key
The Registry key that needs to be modified related to the .NET Framework version might be protected and not allow direct editing. You may need to take ownership of this key to gain the necessary permissions to modify it. In the Registry Editor, navigate to the following path:
HKEY_LOCAL_MACHINE\SOFTWARE\Microsoft\NET Framework Setup\NDP\v4\Client
Right-click on the “Client” key in the left pane and select “Permissions.” In the “Permissions for Client” window, click the “Advanced” button. In the “Advanced Security Settings for Client” window, find the “Owner” section at the top. Next to “TrustedInstaller,” click the “Change” link. In the “Select User or Group” window, type “Administrators” in the “Enter the object name to select” box and click “Check Names.” Windows should recognize “Administrators.” Click “OK.” Back in the “Advanced Security Settings for Client” window, ensure that “Replace owner on subcontainers and objects” is checked (it might be checked by default). Click “Apply” and then “OK.” You may be prompted with a security warning; click “OK” to proceed. Close the “Permissions for Client” window.
3.3. Modify Registry Value
Now that you have taken ownership, you can modify the “Version” value within the “Client” key. In the Registry Editor, navigate back to:
HKEY_LOCAL_MACHINE\SOFTWARE\Microsoft\NET Framework Setup\NDP\v4\Client
In the right pane, find the entry named “Version.” Double-click on “Version” to open the “Edit String” dialog. Note down the original value of “Version.” You will need this value to revert the changes later. The original value might be something like “4.x.x.x.” Replace the “Value data” with “4.5.0.0.” This value is often recognized by older AutoCAD installers as a sufficient .NET Framework version. Click “OK” to save the change.
3.4. Revert Registry Value After Installation
After modifying the Registry value to “4.5.0.0,” try running the AutoCAD installer or launching AutoCAD if it’s already installed but not working. If this registry modification was the solution, AutoCAD should now install or run correctly. Once the installation or troubleshooting process is complete and AutoCAD is working, it is crucial to revert the Registry value back to its original value that you noted down earlier. This is important because other applications on your system might rely on the actual .NET Framework version being correctly reported in the Registry.
To revert the change, navigate back to the “Version” key in the Registry Editor:
HKEY_LOCAL_MACHINE\SOFTWARE\Microsoft\NET Framework Setup\NDP\v4\Client
Double-click on “Version” and change the “Value data” back to the original value you saved (e.g., “4.x.x.x”). Click “OK.” Close the Registry Editor. Restart your computer to ensure all changes are properly applied.
Frequently Asked Questions (FAQs)
Why is my AutoCAD not working?
There are several reasons why AutoCAD might not be working on your Windows 11 system. The most common reasons include:
- Compatibility Issues: Older versions of AutoCAD might have compatibility problems with Windows 11.
- .NET Framework Issues: AutoCAD requires .NET Framework 4.x or later. If it’s not installed, corrupted, or not enabled, AutoCAD may fail.
- Installation Corruption: The AutoCAD installation itself might be corrupted due to the Windows upgrade or other factors.
- System Requirements: Your computer might not meet the minimum system requirements for the specific version of AutoCAD you are using. Ensure your hardware (CPU, RAM, Graphics Card) is sufficient.
- Driver Conflicts: Outdated or incompatible graphics card drivers can sometimes cause AutoCAD to malfunction.
By systematically troubleshooting and following the steps outlined above, you can usually identify and resolve the cause of AutoCAD not working.
Does AutoCAD work on Windows 11?
Yes, AutoCAD is generally compatible with Windows 11. Autodesk, the developer of AutoCAD, officially supports many of its key products on Windows 11. As long as your computer meets the system requirements for your specific AutoCAD version and you have a compatible version of .NET Framework installed, AutoCAD should run without major issues on Windows 11. However, as with any software and operating system combination, occasional compatibility glitches can occur, which is why troubleshooting steps like those described in this guide are helpful. It’s always recommended to use the latest versions of AutoCAD and ensure your system is up to date with Windows updates and drivers for optimal compatibility and performance.
Conclusion
Encountering issues with AutoCAD after upgrading to Windows 11 can be disruptive, but most problems can be resolved with systematic troubleshooting. Starting with simple solutions like reinstalling AutoCAD and checking the .NET Framework installation is often effective. For more complex scenarios, modifying the Registry to address potential .NET Framework version mismatches can provide a workaround. Remember to always back up your Registry before making any changes and revert any modifications once the issue is resolved. By following these guidelines, you can get AutoCAD up and running smoothly on your Windows 11 system and continue your design and drafting work without interruption.
If you found these troubleshooting steps helpful, or if you have encountered other AutoCAD issues on Windows 11 and discovered different solutions, please share your experiences and insights in the comments below! Your contributions can help other users facing similar challenges.
Post a Comment