Secure Your Data: A Guide to Adjusting Office Account Privacy Settings
In today’s digital age, safeguarding personal data is paramount. Software applications, while designed to enhance productivity and streamline workflows, often come with default settings that might not align with individual privacy preferences. Microsoft Office, a suite of essential applications used by millions worldwide, is no exception. Many users are unaware that certain features within Office, particularly those related to Privacy Options, are automatically enabled upon installation. Microsoft asserts that these default settings are intended to improve user experience, personalize features, and gather diagnostic data to enhance product performance. However, for individuals and organizations with heightened privacy concerns, these defaults may raise questions and necessitate adjustments.
Understanding Office Privacy Settings and the Trust Center
Microsoft Office provides a centralized location to manage security and privacy configurations: the Trust Center. This vital component acts as a control panel, allowing users to review and modify various settings across Office applications like Word, Excel, PowerPoint, and Outlook. The Trust Center is designed to empower users with the ability to customize their privacy levels, ensuring they have granular control over how their data is handled within the Office environment. It is within the Trust Center that you can fine-tune options related to document sharing, the removal of hidden personal information from files, and, crucially, manage your account privacy settings.
The significance of the Trust Center cannot be overstated. It represents Microsoft’s commitment to providing transparency and user control over data privacy. By navigating the Trust Center, users can make informed decisions about the data they share and the level of privacy they maintain while utilizing Office applications. This proactive approach to privacy management is essential for both personal users and businesses seeking to comply with data protection regulations and maintain confidentiality. Understanding the Trust Center is the first step towards securing your data within the Microsoft Office ecosystem.
How to Change Account Privacy Settings in Office: A Step-by-Step Guide
Modifying your Office account privacy settings is a straightforward process that can be accomplished within a few minutes. By following these steps, you can customize your privacy preferences to better suit your needs and comfort levels. This guide will walk you through accessing and adjusting these crucial settings:
Step 1: Open an Office Application and Access the File Tab
Begin by launching any Microsoft Office application installed on your computer. This could be Word, Excel, PowerPoint, Outlook, or any other application within the suite. Once the application is open, locate the File tab, typically positioned in the top-left corner of the application window, within the Ribbon menu. Clicking on the File tab will take you to the backstage view, which provides access to various settings and options related to the application and your files.
Step 2: Navigate to Options from the Left Panel
Within the backstage view, a panel will appear on the left-hand side of the screen. Scroll down this panel and locate the Options menu item. Clicking on Options will open a dedicated window containing a wide range of application-specific settings. This is where you can customize various aspects of the Office application, including general settings, display preferences, proofing tools, and, importantly, the Trust Center.
Step 3: Select the Trust Center
In the Options window, another panel will appear on the left. From this list of options, find and select Trust Center. The Trust Center is specifically designed to house security and privacy settings for the Office application. Selecting this option will display the Trust Center settings in the main section of the window, providing access to configure your privacy preferences.
Step 4: Access Trust Center Settings
Once you have selected Trust Center, you will see a button labeled Trust Center Settings on the right-hand side of the window. Click this button to open the Trust Center window. This new window provides a more detailed view of the various security and privacy settings available for customization. It is within this window that you will find the Privacy Options section, which is the focus of this guide.
Step 5: Scroll Down to Privacy Options
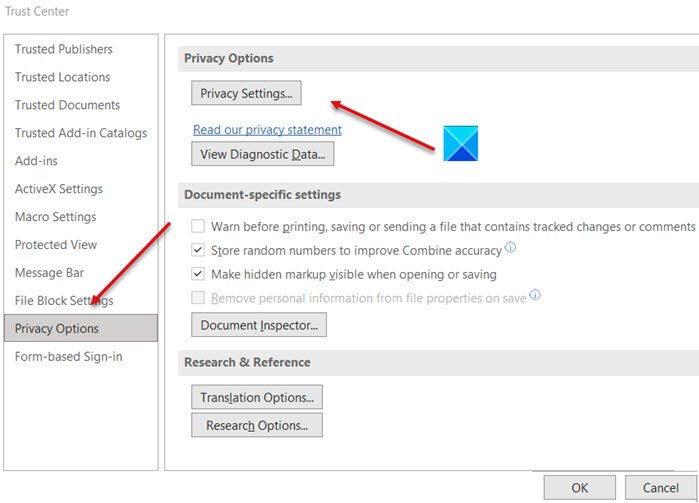
Within the Trust Center window, you will notice several categories of settings listed on the left-hand side. Scroll down through these categories until you find Privacy Options. Select Privacy Options to display the relevant settings in the main panel of the window. This section is dedicated to controlling various aspects of your privacy within the Office applications.
Step 6: Open Privacy Settings
Under the Privacy Options section, you will find a button labeled Privacy Settings. Click this button to open the Privacy Settings panel. This is the final step to access the granular privacy controls within Microsoft Office. The Privacy Settings panel presents a list of checkboxes and options that govern how your data is handled and shared.
Step 7: Enable or Disable Privacy Options
In the Privacy Settings panel, you will see a list of various privacy-related options. Each option is accompanied by a checkbox. To enable a particular privacy option, check the box next to it. To disable an option, uncheck the box. Carefully review each option and decide whether to enable or disable it based on your privacy preferences. Common privacy settings include options related to sending diagnostic data to Microsoft, receiving personalized content, and allowing connected experiences.
After making your selections, click the OK button at the bottom of the Privacy Settings window to save your changes. Then, click OK again to close the Trust Center window and the Options window. Your newly configured privacy settings will now be applied to your Microsoft Office applications.
Alternative Access to Office Privacy Settings
While the method described above is the most common way to access Office privacy settings, there is an alternative, slightly faster route. This method is particularly useful if you frequently adjust your privacy settings or prefer a more direct approach.
Quick Access via Account Settings
- Open any Office App: Launch any Office application, such as Word, Excel, or PowerPoint.
- Go to File > Account: Navigate to the File tab in the Ribbon menu and then select Account from the left-hand panel.
- Click Manage Settings: In the Account page, you will find a section titled “Account Privacy”. Underneath this section, you will see a button labeled Manage Settings. Click on this button to directly open the Privacy Settings panel, bypassing the need to go through the Trust Center in detail.
This alternative method provides a shortcut to the same Privacy Settings panel, allowing for quicker adjustments to your privacy preferences. Both methods lead to the same destination, offering flexibility in how you choose to manage your Office privacy.
Understanding Common Privacy Options
The Privacy Settings panel within Microsoft Office offers a range of options to control your data privacy. While the specific options may vary slightly depending on your Office version and subscription, some common settings include:
- Send diagnostic data to Microsoft: This setting controls whether your Office applications send diagnostic data to Microsoft. This data is intended to help Microsoft improve their products and services by identifying and resolving issues. You can choose to send required diagnostic data, optional diagnostic data, or no diagnostic data at all. Disabling optional diagnostic data can enhance your privacy.
- Connected experiences: This category governs features in Office that connect to the internet to provide enhanced functionality. Examples include online templates, research tools, and translation services. You can choose to enable or disable all connected experiences, or selectively disable certain types of connected experiences. Disabling connected experiences can limit data sharing but may also reduce some functionality.
- Personalized content: This setting controls whether Microsoft Office applications personalize content based on your usage patterns and preferences. This can include suggestions for features, templates, and content tailored to your work style. Disabling personalized content can reduce data collection related to your application usage.
- Allow Office to connect to the Internet: This is a broader setting that controls whether Office applications can connect to the internet at all. Disabling this entirely will severely limit functionality, as many features rely on internet connectivity. It is generally recommended to leave this enabled while managing more granular privacy settings instead.
It’s important to carefully review each privacy option and understand its implications before making changes. Consider your personal privacy priorities and the level of functionality you require from Office applications when configuring these settings.
The Importance of Regularly Reviewing Privacy Settings
Privacy settings are not a “set it and forget it” aspect of software applications. As software evolves, and as your own privacy concerns and needs may shift over time, it’s crucial to periodically review and adjust your Office privacy settings. Microsoft may introduce new privacy features or modify existing ones in updates. Staying informed about these changes and regularly checking your settings ensures that your privacy preferences remain aligned with your current needs.
Furthermore, consider reviewing your privacy settings whenever you install a new version of Office or make significant changes to your computer or account. Taking a proactive approach to privacy management, including regular reviews of your Office settings, is a vital step in maintaining control over your personal data in the digital environment.
Further Information and Resources: Microsoft Office Privacy Statement
For a comprehensive understanding of Microsoft’s data handling practices and privacy policies related to Office applications, it is highly recommended to consult the official Privacy Statement for Microsoft Office. This document provides detailed information about the types of data collected, how it is used, and the measures Microsoft takes to protect user privacy. The Privacy Statement is a valuable resource for gaining deeper insights into the privacy aspects of Microsoft Office and making informed decisions about your privacy settings. You can typically find a link to the Privacy Statement within the Privacy Settings panel in Office applications, or by searching for “Microsoft Office Privacy Statement” online.
Conclusion: Take Control of Your Office Privacy
Adjusting your Office account privacy settings is a simple yet powerful step you can take to enhance your data security and maintain control over your personal information. By understanding the Trust Center and the available Privacy Options, you can customize your Office experience to align with your privacy preferences. Regularly reviewing and updating these settings ensures that you remain in control of your data within the Microsoft Office ecosystem. Take the time today to explore your Office privacy settings and create a configuration that best suits your needs and privacy expectations.
Do you have any questions about managing your privacy settings in Microsoft Office? Share your thoughts and experiences in the comments below!
Post a Comment