Step-by-Step Guide: Installing Active Directory and Adding Users Effectively
Active Directory (AD) is a cornerstone of modern Windows Server environments, acting as a directory service that significantly streamlines the management of permissions and access control to network resources. For IT administrators, understanding how to effectively install and configure Active Directory, including the crucial tasks of adding and managing users and groups, is paramount. This guide provides a detailed, step-by-step walkthrough of the installation process and essential user and group management techniques within Active Directory.
Installing Active Directory Domain Services
Active Directory Domain Services (AD DS) is a server role that is integral to Windows Server. Its installation is the first step in establishing a robust directory service infrastructure. The Server Manager interface provides a straightforward method for adding this role. Let’s delve into the process of installing Active Directory Domain Services:
-
Launch Server Manager: Begin by opening Server Manager on your Windows Server. This central management console provides access to various server roles and features.
-
Initiate the Add Roles and Features Wizard: Within Server Manager, navigate to the Tools menu and select Add Roles and Features. This action will launch the Add Roles and Features Wizard, guiding you through the installation process.
-
Proceed Through the Wizard: Click Next to advance through the initial screens of the wizard until you reach the Server Roles selection page. Carefully review each screen to ensure you understand the options presented, although for a basic AD DS installation, the default settings are often sufficient until you reach the Server Roles tab.
-
Select Active Directory Domain Services: On the Server Roles page, locate Active Directory Domain Services in the roles list. Check the box next to it to select this role for installation.
-
Feature Installation Confirmation: Upon selecting Active Directory Domain Services, a pop-up window may appear, prompting you to add required features for AD DS. Acknowledge this prompt and click Add Features to proceed. These features are dependencies necessary for the proper functioning of Active Directory.
-
Complete the Installation: Continue clicking Next through the wizard, reviewing the installation selections on the Confirmation page. Finally, click Install to initiate the installation process of Active Directory Domain Services. The server will install the necessary binaries and components for the AD DS role.
Once the installation of the Active Directory Domain Services role is complete, you will need to promote this server to a Domain Controller to fully activate Active Directory. A notification will typically appear in Server Manager prompting you to promote the server to a domain controller.
Promoting the Server to a Domain Controller and Configuring the Domain
After installing the AD DS role, the next crucial step is to promote the server to a domain controller. This process configures the server to manage a domain and provides the core directory services functionality. Follow these steps to promote your server:
-
Initiate Domain Controller Promotion: Click the notification flag in Server Manager, and select the option to Promote this server to a domain controller. This will launch the Active Directory Domain Services Configuration Wizard.
-
Deployment Configuration: In the Deployment Configuration section, choose Add a new forest. This option is used when you are creating a new Active Directory domain from scratch.
-
Specify Root Domain Name: Enter the desired root domain name for your new Active Directory forest. For example, you might use
ad.example.com. This name will be the foundation of your domain structure. Click Next. -
Domain Controller Options: On the Domain Controller Options page, you can typically leave the default settings unless you have specific requirements. Ensure that Domain Name System (DNS) server and Global Catalog (GC) are checked. Set the Directory Services Restore Mode (DSRM) password. This password is critical for disaster recovery and should be stored securely. Click Next.
-
DNS Options Warning: You might encounter a warning regarding DNS delegation. This is often safe to ignore in a new forest setup. Click Next to proceed.
-
NetBIOS Domain Name: The wizard will automatically suggest a NetBIOS domain name based on your root domain name. Accept the default NetBIOS domain name or specify a different one if needed. Click Next.
-
Paths: Review and, if necessary, modify the default paths for the AD DS database, log files, and SYSVOL. In most cases, the defaults are suitable. Click Next.
-
Review Options: Carefully review all your selections on the Review Options page. You can click View Script to export a PowerShell script of your configuration for future reference or automation.
-
Prerequisites Check: The wizard will perform a prerequisites check to ensure your server meets the requirements for becoming a domain controller. Address any errors or warnings that are reported.
-
Install Active Directory: If all prerequisites are met, click Install to begin the domain controller promotion process. The server will configure Active Directory, which may involve a reboot.
After the server reboots, it will be a fully functional domain controller, and you can start managing users and groups within your newly created Active Directory domain.
Creating and Managing User Accounts in Active Directory
User account management is a fundamental aspect of Active Directory administration. IT administrators frequently interact with user accounts for tasks such as creation, modification, and deletion. Let’s explore the essential steps for managing user accounts in Active Directory.
Creating a New User Account
-
Open Active Directory Users and Computers: Launch Active Directory Users and Computers from the Tools menu in Server Manager. This MMC snap-in is the primary tool for managing users, groups, and other objects within Active Directory.
-
Navigate to the Users Container: In the Active Directory Users and Computers console, locate your domain and organizational units (OUs). Navigate to the OU where you want to create the new user account, and then select the Users container within that OU. Best practice dictates organizing users within OUs for better management and policy application.
-
Initiate User Creation: Right-click on the Users container, select New, and then click User. This will open the New Object - User dialog box.
-
Enter User Information: In the New Object - User dialog, you will need to provide essential user information:
- First name: Enter the user’s first name.
- Last name: Enter the user’s last name.
- User logon name: This is the username the user will use to log in to the domain. Choose a unique and appropriate username.
- User logon name (pre-Windows 2000): This field is for compatibility with older systems and is often pre-filled based on the user logon name. You can typically leave it as is.
-
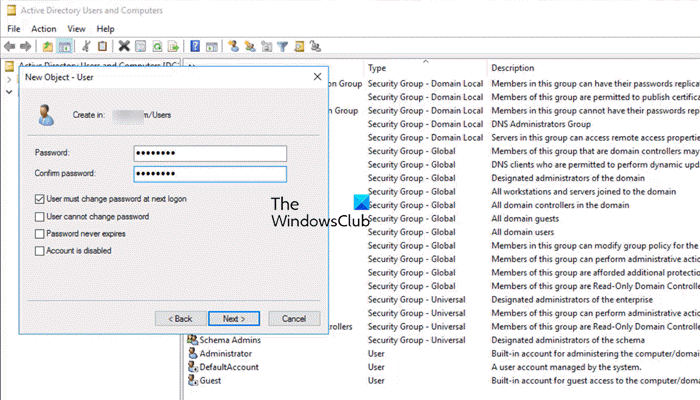
Set Password: After entering the user’s name and logon name, click Next. You will be prompted to set the user’s initial password.
- Password: Enter a strong password for the user account.
- Confirm password: Re-enter the password to confirm it.
- Password Options: Choose appropriate password options, such as:
- User must change password at next logon: This is generally recommended for new accounts to ensure the user sets their own password.
- Password never expires: Use this option cautiously, as it can reduce security. It’s generally better to enforce password expiration policies.
- Account is disabled: If you want to create the account but prevent immediate login, you can disable it.
- Account is locked out: This option is typically not set during account creation but indicates a locked account due to too many incorrect password attempts.
-
Review and Finish: Click Next to review the summary of the new user account details. Verify all the information is correct, and then click Finish to create the user account in Active Directory.
The new user account is now created and ready for use within the Active Directory domain. You can further customize the user account properties as needed.
Modifying User Account Properties
After creating a user account, you can modify its properties to adjust settings such as login hours, account restrictions, profile paths, and group memberships.
-
Locate User Account: In Active Directory Users and Computers, find the user account you wish to modify.
-
Open Properties: Right-click on the user account and select Properties. This will open the user account properties dialog box, which is organized into several tabs.
-
Explore Account Properties: Navigate through the different tabs to modify various aspects of the user account:
- General: Modify basic information like first name, last name, display name, description, office, telephone numbers, email address, and web page.
- Address: Enter address details for the user.
- Account: Configure account options such as user logon name, logon hours, account expiration, account options (e.g., password never expires, account is disabled), and dial-in permissions.
- Profile: Set the user profile path, logon script, and home folder.
- Telephones: Add telephone numbers.
- Organization: Specify the user’s title, department, company, manager, and direct reports.
- Member Of: View and manage the groups the user is a member of.
- Dial-in: Configure dial-in and VPN settings.
- Environment: Set terminal services profile path and logon script.
- Sessions: View terminal services session settings.
- Remote control: Configure remote control settings for terminal services.
- Terminal Services Profile: Set terminal services profile path and home directory.
- Published Certificates: View published certificates for the user.
- Delegation: Configure delegation settings.
- Attribute Editor: For advanced users, this tab allows direct modification of Active Directory attributes.
Restricting User Login Hours
Limiting user login hours is a security measure that restricts when a user can access domain resources.
-
Access Logon Hours: In the user account properties, go to the Account tab and click on Logon Hours. This will open a graphical representation of the user’s allowed logon times for each day of the week.
-
Configure Logon Hours: By default, all hours are set to Logon Permitted (represented by white boxes). To restrict login hours, select the time slots you want to deny access to. Click and drag to select multiple hours. Then, click Logon Denied (represented by blue boxes) to apply the restriction to the selected hours.
-
Apply Changes: Once you have configured the desired login hours, click OK in the Logon Hours dialog, and then click OK in the user account properties dialog to save the changes.
Unlocking a Locked User Account
If a user enters an incorrect password too many times, their account may be locked out for security reasons. Administrators can quickly unlock a locked account.
-
Locate Locked Account: Find the locked user account in Active Directory Users and Computers.
-
Unlock Account: In the user account properties, go to the Account tab. Look for the Unlock account checkbox. If the account is locked, this checkbox will be available. Tick the Unlock account checkbox.
-
Apply Unlock: Click Apply and then OK to unlock the user account. The user should now be able to attempt to log in again. It’s advisable to have the user reset their password if they have forgotten it to prevent future lockouts.
Deleting a User Account
When an employee leaves the organization or a user account is no longer needed, it should be deleted for security and administrative hygiene.
-
Locate User Account: Find the user account you want to delete in Active Directory Users and Computers.
-
Initiate Deletion: Right-click on the user account and select Delete.
-
Confirmation: A confirmation dialog box will appear, asking if you are sure you want to delete the user account. Click Yes to confirm the deletion.
Caution: Deleting a user account is a permanent action. Ensure you have backed up any necessary data associated with the user account before deletion. Consider disabling the account instead of deleting it if there’s a possibility the account might be needed again in the future.
Creating and Managing Groups in Active Directory
Groups in Active Directory are essential for simplifying permission assignments and managing access for multiple users simultaneously. Groups allow you to assign permissions to a group rather than to individual users, making administration much more efficient.
Creating a New Group
-
Navigate to Group Creation Location: In Active Directory Users and Computers, navigate to the organizational unit or container where you want to create the new group. You can create groups in the Users container or within specific OUs depending on your organizational structure.
-
Initiate Group Creation: Right-click on the desired container, select New, and then click Group. This will open the New Object - Group dialog box.
-
Enter Group Information: In the New Object - Group dialog, provide the following information:
- Group name: Enter a descriptive name for the group. Choose a name that clearly indicates the group’s purpose (e.g., “Marketing Department Users,” “Sales Team Access”).
- Group scope: Select the group scope. The common scopes are:
- Domain local: Used to grant permissions to resources within the same domain where the group is created.
- Global: Used to organize users who have similar job functions or roles. Global groups can be granted permissions in any domain within the forest.
- Universal: Used to grant permissions across multiple domains in a forest. Universal groups are replicated to all domain controllers in the forest, so use them judiciously.
For most organizational purposes within a single domain, Global scope is often sufficient.
- Group type: Select the group type:
- Security: Security groups are used to grant permissions to resources. They can be used in Access Control Lists (ACLs) to control access to files, folders, printers, and other resources.
- Distribution: Distribution groups are primarily used for email distribution lists in Microsoft Exchange. They are not security principals and cannot be assigned permissions.
For managing access to resources and permissions, ensure you select Security as the group type. Avoid changing the default Group Type to Distribution unless you specifically need to create an email distribution list for Microsoft Exchange or similar email systems.
-
Create Group: Click OK to create the group. The new group will now appear in the selected container.
Adding Users to a Group
Once a group is created, you need to add users to it to grant them the permissions associated with the group. There are two primary methods to add users to a group: from the group properties or from the user properties.
Method 1: Adding Users from Group Properties
-
Locate Group: In Active Directory Users and Computers, find the group to which you want to add users.
-
Open Group Properties: Right-click on the group and select Properties.
-
Navigate to Members Tab: In the group properties dialog, click on the Members tab.
-
Add Users: Click the Add button. This will open the Select Users, Contacts, Computers, or Groups dialog.
-
Search for Users: In the Select Users, Contacts, Computers, or Groups dialog, you can search for users to add to the group.
- Name: Type the name or part of the name of the user you want to add.
- Advanced: Click Advanced for more search options, such as searching by specific attributes or using complex queries. Click Find Now to initiate the search.
-
Select Users: From the search results, select the users you want to add to the group. You can select multiple users by holding down the Ctrl key while clicking.
-
Confirm User Addition: Click OK to add the selected users to the group. The users will now be listed in the Members tab of the group properties.
-
Apply Changes: Click Apply and then OK in the group properties dialog to save the changes and add the users to the group.
Method 2: Adding Groups from User Properties
-
Locate User: In Active Directory Users and Computers, find the user you want to add to a group.
-
Open User Properties: Right-click on the user and select Properties.
-
Navigate to Member Of Tab: In the user properties dialog, click on the Member Of tab. This tab lists the groups that the user is currently a member of.
-
Add Group: Click the Add button. This will open the Select Groups dialog.
-
Search for Groups: In the Select Groups dialog, search for the group you want to add the user to, similar to the user search process described in Method 1.
-
Select Group: From the search results, select the group.
-
Confirm Group Addition: Click OK to add the selected group to the user’s membership. The group will now be listed in the Member Of tab of the user properties.
-
Apply Changes: Click Apply and then OK in the user properties dialog to save the changes and add the user to the group.
Both methods achieve the same result of adding users to groups. Choose the method that is most convenient based on whether you are starting from the group or the user perspective.
Installing Active Directory and Users Using PowerShell
For administrators who prefer command-line interfaces or need to automate Active Directory tasks, PowerShell provides powerful cmdlets for installing Active Directory Domain Services and managing users.
Installing RSAT-AD-Tools Feature via PowerShell
To manage Active Directory from a Windows client machine (like Windows 10 or Windows 11), you need to install the Remote Server Administration Tools (RSAT) for Active Directory Domain Services and Lightweight Directory Services Tools feature. PowerShell simplifies this process.
-
Open PowerShell as Administrator: Launch PowerShell with administrative privileges. Right-click on the PowerShell icon and select “Run as administrator.”
-
List Available RSAT Capabilities: Run the following PowerShell command to list all available RSAT features:
Get-WindowsCapability -Name RSAT* -Online | Select-Object -Property DisplayName, Name, State
This command retrieves a list of Windows capabilities that match the “RSAT*” name pattern, which includes RSAT features. The output will display the DisplayName, Name, and State of each RSAT capability.
-
Identify Active Directory Tools Capability Name: From the output of the previous command, locate the capability name that starts with “Rsat.ActiveDirectory.” Copy the full name, including the version information (e.g.,
Rsat.ActiveDirectory.DS-LDS.Tools~~~~0.0.1.0). -
Install Active Directory Tools Capability: Use the following PowerShell command to install the RSAT Active Directory tools, replacing
<copied-version-information>with the actual version information you copied in the previous step:
Add-WindowsCapability -Online -Name Rsat.ActiveDirectory<copied-version-information>
For example:
Add-WindowsCapability -Online -Name Rsat.ActiveDirectory.DS-LDS.Tools~~~~0.0.1.0
This command will initiate the installation of the RSAT Active Directory tools feature. PowerShell will display progress information during the installation.
- Verify Installation: After the command completes successfully, the RSAT Active Directory tools will be installed. You can verify the installation by running the
Get-WindowsCapabilitycommand again and checking the State of the “Rsat.ActiveDirectory” capability, which should now be “Installed.” You should also find the Active Directory Users and Computers, Active Directory Administrative Center, and other AD management tools in your Start Menu under “Windows Administrative Tools.”
PowerShell provides a streamlined method for installing RSAT tools, which are essential for remotely managing Active Directory environments from client machines.
Adding Users in Active Directory Using GUI
As previously outlined, the graphical user interface (GUI) method using Active Directory Users and Computers is a common and straightforward approach for adding users.
-
Open Active Directory Users and Computers: Access the Active Directory Users and Computers MMC snap-in on a domain controller or a machine with RSAT-AD-Tools installed.
-
Navigate to Users Container: Navigate through your domain and organizational unit structure to the Users container or the specific OU where you want to create the new user account.
-
Initiate User Creation: Right-click on the Users container, select New, and then User.
-
Enter User Details: Fill in the New Object - User dialog box with the user’s first name, last name, user logon name, and set the initial password, as described in the “Creating a New User Account” section earlier in this guide.
-
Complete User Creation: Review the details, click Next, and then Finish to create the user account.
The GUI method is intuitive and suitable for most user account creation tasks, especially in smaller environments or when performing occasional user management.
Active Directory is a powerful and essential service for managing network resources and user access in Windows Server environments. Mastering the installation process and understanding how to effectively manage users and groups are critical skills for IT administrators. This guide has provided a comprehensive step-by-step walkthrough of these fundamental tasks, empowering you to confidently administer your Active Directory infrastructure.
Feel free to share your experiences or ask any questions in the comments below!
Post a Comment