Fix Camera Error 0xA00F429E: Troubleshooting 'PageOpenFailed' Issues on Windows
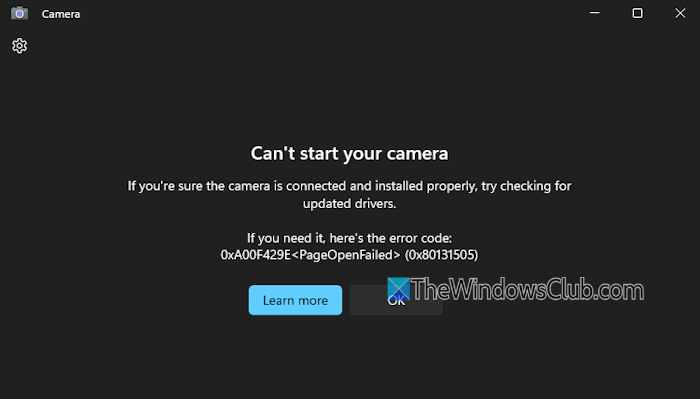
Many Windows 11 and Windows 10 users have encountered a frustrating issue where the built-in Camera application fails to launch or operate correctly. Instead of displaying the camera feed, users are greeted with an error message stating, “Can’t start your camera,” accompanied by the error code 0xA00F429E<PageOpenFailed> (0x80131505). This error often manifests specifically within the native Windows Camera app, while the same camera hardware might function flawlessly with other applications like Microsoft Teams, Zoom, or Google Meet. In some more severe cases, the camera may cease to function across all applications. If you are experiencing this camera malfunction, this guide provides a series of effective solutions to diagnose and resolve error code 0xA00F429E.
Understanding the “Can’t Start Your Camera” Error 0xA00F429E
The error message “Can’t start your camera,” coupled with the specific code 0xA00F429E<PageOpenFailed> (0x80131505), indicates a problem preventing the Camera application from properly initializing and accessing your camera device. The <PageOpenFailed> component of the error code suggests that the application is encountering difficulties in opening a necessary page or module required for camera operation. The numerical code (0x80131505) is a more technical representation of this failure within the Windows operating system.
It is crucial to note that this error can be somewhat perplexing because the camera hardware itself might be functioning correctly. This is evidenced by the fact that the camera often works without issues in third-party applications. This discrepancy points towards a software or configuration-related problem specifically affecting the Windows Camera application’s ability to interface with the camera device. The issue could stem from various sources, including connection problems, permission settings, driver malfunctions, or even issues within the Camera application itself.
Troubleshooting Steps to Resolve Error 0xA00F429E
To effectively troubleshoot and eliminate the 0xA00F429E camera error, follow these step-by-step solutions. Progress through each methodically, testing your camera after each step to determine if the problem is resolved.
1. Reconnect the Camera
Often, a simple reconnection can resolve connectivity glitches that might be causing the error. This solution is particularly relevant for external webcams connected via USB or when using your phone’s camera as a webcam through applications like Phone Link. Disconnect your webcam from the USB port and then reconnect it securely. If you are using a USB hub, try connecting the webcam directly to a USB port on your computer.
For users utilizing phone cameras as webcams, ensure that the connection between your phone and computer is stable. This may involve re-establishing the link through the Phone Link application or similar software. Furthermore, verify the notification and permission settings for both the Phone Link app on your PC and the companion app on your mobile device. Incorrect settings can sometimes interfere with camera functionality. After reconnecting, restart your computer to ensure the changes are fully implemented. If your webcam or laptop has a physical privacy switch or button for the camera, ensure it is in the ‘on’ position. These physical controls can sometimes be inadvertently toggled, disabling the camera at a hardware level.
2. Enable Camera Access for Apps
Windows operating systems have privacy settings that control which applications are permitted to access your camera. If camera access is disabled for specific applications, including the Camera app, it will result in errors. To check and adjust these settings:
- Open the Settings application. You can do this by pressing the Windows key + I simultaneously, or by searching for “Settings” in the Start Menu.
- Navigate to Privacy & Security, and then select Camera.
- Under the “Let apps access your camera” section, ensure the toggle switch is turned On.
- Below this, you will find a list of applications. Verify that the applications you want to use with your camera, especially the “Camera” app, are enabled to access the camera. You may see two categories: “Microsoft Store apps” and “Desktop apps.” Ensure access is granted for both if necessary.
By enabling camera access for applications, you ensure that the operating system is not blocking the Camera app (or other apps) from utilizing your camera hardware.
3. Utilize the Camera Troubleshooter
Windows includes a built-in troubleshooter specifically designed to diagnose and automatically fix common camera problems. This troubleshooter can be accessed through the Get Help app and can often resolve configuration issues or minor software conflicts.
- Open the Settings application.
- Go to Bluetooth & devices and then select Cameras.
- In the “Connected cameras” section, locate the camera that is experiencing issues and click on it.
- You should see a “Troubleshoot” button. Click this button.
- This will launch the Get Help app. Select the “Troubleshoot Camera in Windows 11” (or Windows 10) option.
- Follow the on-screen prompts provided by the troubleshooter. It will automatically run diagnostics, attempt to identify problems, and apply fixes where possible.
The Camera troubleshooter automates the process of identifying and resolving common camera-related issues, making it a valuable tool for less technically inclined users.
4. Update or Reinstall Camera Drivers
Outdated, corrupted, or incompatible camera drivers are a frequent cause of camera malfunctions. Drivers are essential software components that allow your operating system to communicate effectively with your camera hardware.
Updating Camera Drivers:
- Open the Settings application.
- Navigate to Windows Update and then select Advanced options.
- Click on “Optional updates”.
- Look for a section labeled “Driver updates.” If camera driver updates are available, select them and click “Download & install”.
If no driver updates are available through Windows Update, you can manually download the latest drivers from the camera manufacturer’s website. Identify the exact model of your camera (especially for external webcams) and visit the manufacturer’s support or downloads page. Search for drivers compatible with your version of Windows and download the latest version. Follow the manufacturer’s installation instructions.
Reinstalling Camera Drivers:
If updating does not resolve the issue, reinstalling the camera driver can often fix problems caused by driver corruption.
- Right-click on the Start Menu and select “Device Manager”.
- Expand the “Cameras” section.
- Right-click on your camera device and select “Uninstall device”.
- In the confirmation dialog, check the box that says “Delete the driver software for this device” if it is available, and then click “Uninstall”.
- Restart your computer. Upon restart, Windows will automatically attempt to reinstall the camera driver. In most cases, it will install a generic driver if a specific one is not readily available.
Reinstalling the driver ensures that you have a clean installation, potentially eliminating any corrupted driver files that were causing the error.
5. Repair or Reset the Camera App
If the issue is isolated to the Camera application itself, repairing or resetting the app can often resolve the problem. These options are available within the Windows Settings.
- Open the Settings application.
- Go to Apps and then select “Installed apps” (or “Apps & features” in older Windows versions).
- Find the “Camera” app in the list. Click on the three dots next to “Camera” and select “Advanced options”.
-
You will see two buttons: “Repair” and “Reset”.
- Repair: Click “Repair” first. This option attempts to fix any issues with the app’s files and settings without deleting your personal data.
- Reset: If repair does not work, click “Reset”. Warning: Resetting the app will delete all of its data, including settings and preferences. You will need to reconfigure the app after resetting.
If neither repair nor reset resolves the problem, a more drastic step is to uninstall and then reinstall the Camera app. You can usually uninstall the Camera app from the same “Advanced options” page in Settings. After uninstalling, you can reinstall it from the Microsoft Store. Search for “Windows Camera” in the Store and install it.
Addressing Related Camera Errors
While focusing on error 0xA00F429E, it’s helpful to be aware of other related camera error codes that users might encounter. Understanding these can help you differentiate issues and apply the correct troubleshooting steps.
Fixing Error Code 0xA00F429F
Error code 0xA00F429F<WindowShowFailed> (0x887A0004) is another camera-related error that can occur in Windows 11/10. This error often points to problems with the graphics subsystem or media foundation components. A common fix involves modifying the Windows Registry:
Caution: Modifying the Registry incorrectly can cause serious system problems. Back up your Registry before making any changes.
- Open Registry Editor. Type “regedit” in the Start Menu search box and press Enter.
- Navigate to the following registry key:
HKEY_LOCAL_MACHINE\SOFTWARE\WOW6432Node\Microsoft\Windows Media Foundation\Platform
(If theWOW6432Nodekey does not exist, navigate toHKEY_LOCAL_MACHINE\SOFTWARE\Microsoft\Windows Media Foundation\Platform) - In the right-hand pane, right-click on an empty space, select “New” > “DWORD (32-bit) Value”.
- Name the new DWORD value “EnableFrameServerMode”.
- Double-click on “EnableFrameServerMode” and set its “Value data” to 0 (zero).
- Click “OK” and close Registry Editor.
- Restart your computer.
This registry modification disables Frame Server Mode, which can sometimes resolve conflicts causing the 0xA00F429F error.
If the 0xA00F429F error started after a camera driver update, consider rolling back to the previous driver version. You can do this through Device Manager by going to the camera’s properties, selecting the “Driver” tab, and clicking “Roll Back Driver” (if the option is available).
Understanding Error Code 0xA00F4289
Error code 0xA00F4289 <ActiveCameraUnplugged> (0xC00D3EA2) typically indicates that the system believes the camera is disconnected or unavailable, even if it is physically connected. This error can be triggered by various factors, including disabled webcams, antivirus software blocking camera access, or issues with the Windows Camera Frame Server service.
To troubleshoot error 0xA00F4289:
- Check Device Manager: Ensure your camera is listed under “Cameras” in Device Manager and that there are no error icons (yellow exclamation marks) next to it. If there is an error icon, troubleshoot the device in Device Manager.
- Start Windows Camera Frame Server Service:
- Press Windows key + R, type
services.msc, and press Enter to open the Services window. - Find the “Windows Camera Frame Server” service in the list.
- Right-click on it and select “Properties”.
- Ensure the “Startup type” is set to “Automatic”.
- If the service is not running, click “Start”.
- Click “Apply” and “OK”.
- Press Windows key + R, type
- Check Antivirus/Firewall: Temporarily disable your third-party antivirus or firewall software to see if it is blocking camera access. If disabling the security software resolves the error, configure your antivirus/firewall to allow access for the Camera app.
By addressing these potential causes, you can often resolve the 0xA00F4289 error.
Conclusion
Encountering the “Can’t start your camera” error with code 0xA00F429E can be a disruptive experience. However, by systematically working through the troubleshooting steps outlined in this guide, you can effectively diagnose and resolve the issue. Starting with simple solutions like reconnecting the camera and checking app permissions, progressing to driver updates and app repair, and finally considering related error codes, you have a comprehensive toolkit to restore your camera functionality on Windows. Remember to test your camera after each step to pinpoint the exact solution that works for you.
If you continue to experience issues or have further questions, please feel free to leave a comment below. Your experiences and questions can help others facing similar camera problems.
Post a Comment