Fortify Your Firmware: Secure Launch with System Guard for Enhanced Protection
In today’s digital landscape, security threats are constantly evolving, targeting not only software but also the very foundation of our devices – the firmware. Microsoft Secured-core PCs are designed with a deeply integrated approach to hardware, firmware, and software security, offering enhanced protection for devices, identities, and sensitive data. A crucial component of this enhanced security is System Guard Secure Launch for Firmware Protection. Enabling this feature is a vital step in ensuring your system boots into a secure and trusted state, safeguarding against firmware-level attacks and vulnerabilities. This article will guide you through the process of enabling System Guard Secure Launch for Firmware Protection, empowering you to fortify your system’s defenses.
Understanding the Importance of Firmware Protection
Firmware, the software embedded in hardware components, plays a critical role in the boot process and overall system functionality. Traditionally, firmware has been a less scrutinized area in terms of security, making it an attractive target for sophisticated attackers. Vulnerabilities in firmware can be exploited to gain persistent access to a system, bypass operating system security measures, and even compromise hardware functionality. Malware that infects firmware is particularly dangerous as it can be extremely difficult to detect and remove, often surviving operating system re-installations and even hard drive replacements.
Secured-core PCs address this critical security gap by implementing hardware-enforced root of trust. This means that the system’s boot process is anchored in hardware, ensuring that only verified and trusted firmware and software are loaded during startup. System Guard Secure Launch is a key technology that leverages this hardware root of trust to protect against firmware tampering and ensure a clean and secure boot environment. By enabling Firmware Protection, you are essentially activating a powerful defense mechanism that minimizes the risk of firmware-based attacks and enhances the overall security posture of your device. This protection extends to both physical and virtual threats, ensuring that all executed code is signed by authorized entities and preventing unauthorized access to critical system components.
Methods to Enable Firmware Protection
Enabling Firmware Protection on your Secured-core PC is a straightforward process. There are primarily two methods available to activate this crucial security feature:
- Enabling Firmware Protection through Windows Security Application
- Enabling Firmware Protection via Registry Editor
Both methods achieve the same outcome – activating System Guard Secure Launch for Firmware Protection. However, they cater to different user preferences and access levels. Let’s explore each method in detail to help you choose the approach that best suits your needs.
1. Enabling Firmware Protection via Windows Security Application
The Windows Security application provides a user-friendly interface for managing various security settings on your Windows system, including Firmware Protection. This method is generally recommended for most users due to its ease of use and visual guidance. Follow these steps to enable Firmware Protection using the Windows Security app:
-
Open Windows Security: Begin by accessing the Windows Security application. You can easily find it by typing “Windows Security” in the Start Menu search bar and clicking on the application icon when it appears.
-
Navigate to Device Security: Once the Windows Security app is open, locate and click on the “Device Security” option in the left-hand navigation menu. This section consolidates security settings related to your device’s hardware and firmware.
-
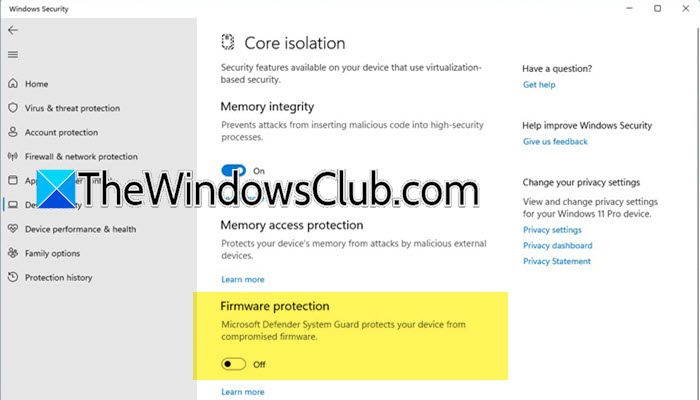
Access Core Isolation Details: Within the Device Security section, you will find a “Core isolation” section. Click on the “Core isolation details” hyperlink. This will take you to the dedicated Core isolation settings page, where you can manage features like Memory integrity and Firmware protection.
-
Enable Firmware Protection Toggle: On the Core isolation screen, you will see a toggle switch labeled “Firmware protection”. Simply click on this toggle to switch it to the “On” position. This action initiates the process of enabling System Guard Secure Launch for Firmware Protection.
-
User Account Control (UAC) Prompt: Depending on your system’s security settings, you might encounter a User Account Control (UAC) prompt asking for confirmation to make changes to your device. Click “Yes” to proceed. If you have administrator credentials set up, you may need to enter them at this stage.
-
Restart Your Computer: After enabling the Firmware protection toggle and confirming the UAC prompt, it is crucial to restart your computer for the changes to take full effect. The Firmware Protection feature is activated during the system startup process.
Once your computer restarts, System Guard Secure Launch for Firmware Protection will be enabled. You can verify this by revisiting the Core isolation settings in the Windows Security app, where the Firmware protection toggle should now be in the “On” position.
Note: In some cases, the Firmware Protection toggle might appear greyed out or unavailable. This could indicate that your system does not meet the hardware requirements for Firmware Protection, or that the feature is managed by your IT administrator. If the toggle is greyed out and you believe your system should support Firmware Protection, you may need to contact your IT administrator for assistance, especially if you are in a managed corporate environment. They might need to grant you the necessary permissions or enable the settings from their end.
2. Enabling Firmware Protection via Registry Editor
The Registry Editor provides a more direct, albeit potentially more complex, method to enable Firmware Protection. This method is suitable for users who are comfortable working with the Windows Registry and prefer a script-based approach. Modifying the registry incorrectly can lead to system instability, so it is crucial to back up your registry before making any changes.
Precaution: Backing Up Your Registry
Before proceeding with Registry Editor modifications, always create a backup of your registry. This allows you to restore your registry to its previous state in case of any unintended issues. To back up your registry:
- Open Registry Editor by typing “regedit” in the Start Menu search bar and pressing Enter.
- In the Registry Editor window, click on “File” in the menu bar.
- Select “Export” from the dropdown menu.
- Choose a secure location on your computer to save the backup file.
- In the “File name” field, enter a descriptive name for the backup file (e.g., “RegistryBackup_FirmwareProtection”).
- Ensure that “Export range” is set to “All”.
- Click “Save”.
Once the registry backup is complete, you can proceed with the following steps to enable Firmware Protection using Registry Editor:
-
Open Notepad: Open a new Notepad document.
-
Enter Registry Code for Enabling Firmware Protection: Copy and paste the following code into the Notepad document. This code is designed to enable System Guard Secure Launch for Firmware Protection by modifying a specific registry key:
Windows Registry Editor Version 5.00

[HKEY_LOCAL_MACHINE\SYSTEM\CurrentControlSet\Control\DeviceGuard\Scenarios\SystemGuard]
"Enabled"=dword:00000001
Explanation of the Code:
Windows Registry Editor Version 5.00: Specifies the registry file format version.[HKEY_LOCAL_MACHINE\SYSTEM\CurrentControlSet\Control\DeviceGuard\Scenarios\SystemGuard]: Indicates the specific registry key path where the setting for System Guard is located.HKEY_LOCAL_MACHINErepresents the local computer’s configuration,SYSTEMcontains system-level settings,CurrentControlSetis the currently active control set,Controlholds control settings,DeviceGuardis related to Device Guard security features, andScenarios\SystemGuardis the specific subkey for System Guard scenarios."Enabled"=dword:00000001: This line creates or modifies a value named “Enabled” within the specified registry key."Enabled"is the name of the value, anddword:00000001sets its data type to DWORD (a 32-bit integer) and assigns it a value of 1. In the context of System Guard, a value of1typically signifies “enabled”.
-
Save the File as a .reg File: Click on “File” in Notepad, and then select “Save As”. In the “Save As” dialog box:
- Choose “All Files (.)” from the “Save as type” dropdown menu.
- In the “File name” field, enter a name for the file with the
.regextension (e.g.,EnableFirmwareProtection.reg). It’s important to use the.regextension to ensure the file is recognized as a Registry Editor file. - Choose a location to save the file and click “Save”.
-
Run the .reg File: Locate the
EnableFirmwareProtection.regfile you just saved. Double-click on the file to run it. -
Registry Editor Prompt: You will see a prompt asking if you are sure you want to run this file and make changes to the registry. Click “Yes” to proceed.
-
Confirmation Message: You will receive a confirmation message stating that the keys and values contained in the
.regfile have been successfully added to the registry. Click “OK”. -
Restart Your Computer: Restart your computer for the changes to take effect.
After restarting, Firmware Protection will be enabled. You can verify this by checking the Core isolation settings in the Windows Security app, as described in the previous method.
To Disable Firmware Protection using Registry Editor:
If you ever need to disable System Guard Secure Launch for Firmware Protection, you can create another .reg file with the following code:
Windows Registry Editor Version 5.00

[HKEY_LOCAL_MACHINE\SYSTEM\CurrentControlSet\Control\DeviceGuard\Scenarios\SystemGuard]
"Enabled"=dword:00000000
The only difference in this code is the value assigned to "Enabled", which is dword:00000000. A value of 0 typically signifies “disabled”. Save this code as DisableFirmwareProtection.reg, and follow steps 4-7 above to run the file and restart your computer.
Understanding Secure Boot and its Relation to Firmware Protection
Secure Boot is another crucial security feature that works in conjunction with Firmware Protection to enhance system security during the boot process. Secure Boot is a feature of the Unified Extensible Firmware Interface (UEFI) firmware, which is the modern replacement for the traditional BIOS.
How Secure Boot Works:
Secure Boot ensures that only firmware and software that are digitally signed and trusted by the device manufacturer are allowed to load during the boot process. This helps prevent malware from injecting itself into the boot process and compromising the system before the operating system even starts.
Checking if Secure Boot is Enabled:
Secure Boot is often enabled by default on modern systems. You can easily check the status of Secure Boot on your system through the Windows Security app:
- Open the Windows Security app.
- Click on “Device Security”.
- Look for the “Secure boot” section. If you see “Secure boot is on”, then Secure Boot is currently enabled on your system. If the “Secure boot” option is not listed, it might indicate that your system does not support Secure Boot, or it is not properly configured.
Enabling Secure Boot in System Firmware (UEFI/BIOS):
If Secure Boot is not enabled, and your system supports it, you can typically enable it from the UEFI/BIOS settings. The process for accessing UEFI/BIOS settings varies depending on your computer manufacturer. Generally, you need to press a specific key (like Delete, F2, F12, or Esc) during the system startup process, before Windows begins to load. Refer to your motherboard or computer manual for the specific key to press.
Once you are in the UEFI/BIOS settings:
- Navigate to the “Boot” or “Security” section (the exact location may vary).
- Look for “Secure Boot” settings.
- Ensure that “Secure Boot” is set to “Enabled”.
- Save the changes and exit UEFI/BIOS settings. Your system will typically restart automatically.
Caution: Disabling Secure Boot can weaken your system’s security posture. Only disable Secure Boot if you have a specific need to do so, such as booting from an operating system that is not compatible with Secure Boot. Re-enable Secure Boot as soon as possible after you have completed the task that required it to be disabled.
Troubleshooting Boot Issues After Enabling Secure Boot:
In rare cases, enabling Secure Boot might prevent your system from booting properly. This can happen if your operating system or other bootable media is not compatible with Secure Boot. If you encounter boot issues after enabling Secure Boot, you might need to temporarily disable Secure Boot in UEFI/BIOS settings to troubleshoot the problem. Ensure that your operating system and drivers are compatible with Secure Boot and UEFI.
Benefits of Enabling Firmware Protection
Enabling Firmware Protection through System Guard Secure Launch offers a range of significant security benefits, contributing to a more robust and resilient system:
- Protection Against Firmware-Level Attacks: Firmware Protection directly mitigates the risk of attacks that target the system firmware. By ensuring a secure and verified boot process, it prevents malware from embedding itself in the firmware and gaining persistent, low-level control of your device.
- Enhanced Malware Resistance: Firmware-based malware is notoriously difficult to detect and remove. Firmware Protection significantly reduces the attack surface for such malware, making your system more resistant to advanced persistent threats (APTs) and sophisticated attacks.
- Prevention of Unauthorized Access: By verifying the integrity of firmware and boot components, Firmware Protection helps prevent unauthorized access to critical system resources and code. This strengthens the overall security posture of your device and protects sensitive data.
- Hardware-Enforced Security: Leveraging the hardware root of trust, Firmware Protection provides a security foundation that is deeply integrated into the device’s hardware. This hardware-backed security is more resistant to software-based attacks and tampering compared to purely software-based security solutions.
- Compliance and Security Standards: Enabling Firmware Protection can help organizations meet various security compliance requirements and industry best practices. It demonstrates a proactive approach to security and reduces the risk of security breaches and data compromises.
- Improved System Integrity: Firmware Protection contributes to the overall integrity of your system by ensuring that all components involved in the boot process are trusted and verified. This helps maintain a clean and secure computing environment.
By taking the simple steps to enable Firmware Protection, you are adding a critical layer of security to your Windows system, safeguarding against increasingly sophisticated firmware-based threats and enhancing your overall digital security posture.
Enhancing your system’s security is an ongoing process. Have you enabled Firmware Protection on your Secured-core PC? Share your experiences or questions in the comments below!
Post a Comment