Master YouTube: Easily Upload and Delete Videos - A Step-by-Step Guide
YouTube stands as a premier platform for content creators to disseminate their video creations to a global audience. It serves as a vibrant social media hub where individuals can not only consume content from their preferred channels and personalities but also contribute their own narratives and expertise. This guide is designed to empower you with the knowledge and step-by-step instructions necessary to confidently upload and, when needed, delete videos on YouTube, ensuring you have full control over your channel’s content.
How to Upload a Video on YouTube
Uploading videos to YouTube is a straightforward process, designed to be user-friendly even for those new to content creation. By following these steps, you can efficiently share your videos with your audience.
Accessing the Upload Feature
To initiate the upload process, begin by navigating to the YouTube homepage and ensuring you are logged into your account. Look towards the top right corner of the page. You will notice a Create button, often represented by a Mini-Camcorder icon. This icon is your gateway to uploading content. Click on this icon to reveal a dropdown menu with options related to content creation.
Within this dropdown menu, you will find two primary choices: Go Live and Upload video. The Go Live option is for streaming real-time video content, while Upload video is for posting pre-recorded videos. For the purpose of uploading a video file, select the Upload video option. Clicking on Upload video will advance you to the next stage of the process, where you will select the video file you wish to share.
Selecting and Uploading Video Files
Upon selecting Upload video, a new window will materialize, titled Upload Video. This window is designed to guide you through the subsequent steps of uploading and customizing your video. At the center of this window, you will prominently see a button labeled SELECT FILES. Clicking this button will prompt your computer’s file explorer or finder window to appear.
This file dialog box allows you to browse through your computer’s directories and locate the video file you intend to upload to YouTube. Navigate to the folder where your video is saved, select the desired video file, and then click the Open button in the file dialog box. Once you click Open, the upload process will commence automatically. You will observe a progress bar at the bottom of the YouTube upload window, indicating the upload status. While the video is uploading, you can proceed to customize various aspects of your video.
Customizing Video Details: The Details Tab
As your video uploads, YouTube presents a Video details window, often referred to as the Details tab. This is where you input essential information about your video, influencing its discoverability and presentation to viewers. This section is crucial for optimizing your video for search and viewer engagement.
Title
The Title field is the first and arguably most important element to customize. A compelling title is vital for attracting viewers and clearly conveying the content of your video. It should be concise, informative, and ideally incorporate relevant keywords that users might search for on YouTube. Aim for a title that accurately reflects your video’s content while also being engaging and intriguing. For instance, instead of a generic title like “Video Project,” consider something more specific and enticing such as “Beginner’s Guide to Landscape Photography with a Smartphone.”
Description
The Description box provides an opportunity to offer a more detailed overview of your video’s content. This is where you can elaborate on the topics covered, provide context, and include any relevant information that viewers might find useful. Utilize the description to enhance your video’s searchability by incorporating relevant keywords naturally within the text. Furthermore, the description is an excellent place to include links to your social media profiles, website, or other relevant videos and playlists on your channel, encouraging viewers to explore more of your content.
Thumbnail
The Thumbnail is the first visual impression viewers have of your video as they browse YouTube. It’s a static image that represents your video and plays a significant role in attracting clicks. YouTube automatically generates thumbnails from your video, but it is highly recommended to upload a Custom thumbnail. A custom thumbnail allows you to create a visually appealing and attention-grabbing image that accurately represents your video’s content and entices viewers to click. To upload a custom thumbnail, click on the Upload Thumbnail button. A file upload window will appear, enabling you to select an image file from your computer. Choose a high-quality image that is visually engaging and relevant to your video’s topic.
Playlists
Playlists are a powerful organizational tool on YouTube, enabling you to group videos together based on themes or topics. Adding your video to a relevant playlist enhances content discoverability for viewers interested in specific subjects. To add your video to a playlist, click on the Playlist dropdown. You will see a list of your existing playlists. You can either select an existing playlist to add your video to, or create a new playlist. To create a new playlist, click on the Create Playlist option. A small window will pop up, prompting you to enter a Title for your new playlist and choose its Visibility (Public, Private, or Unlisted). Once you’ve named your playlist and set its visibility, click Create. Then, select the newly created playlist (or an existing one) and click Done to add your video to it.
Audience
The Audience section is mandatory and requires you to specify whether your video is Made for Kids or Not Made for Kids. This setting is crucial for compliance with children’s online privacy regulations. Carefully consider your video’s content and target audience when making this selection. If your video is primarily aimed at children, select Yes, it’s Made for Kids. If your video is not specifically targeted at children, select No, it’s Not Made for Kids. This choice impacts various features, including comments and notifications.
More Options
Clicking on SHOW MORE expands additional customization options, allowing for finer control over your video’s settings.
Paid Promotion
If your video includes Paid promotion, such as product placements, sponsorships, or endorsements from third parties, you must declare it in the Paid promotion section. This ensures transparency with your audience and compliance with advertising guidelines. Check the box if your video contains paid promotion.
Tags
Tags are keywords that help viewers find your videos through YouTube’s search engine. Enter relevant tags that describe your video’s topic, themes, and content. Think about the terms viewers might use when searching for videos like yours. Separate tags with commas. Effective use of tags can significantly improve your video’s visibility in search results. Examples of tags might include “tutorial,” “photography tips,” “smartphone photography,” “landscape photography.”
Language, Subtitles, and Closed Captions (CC)
In the Language, subtitles, and closed captions (CC) section, you can specify the Video language. Selecting the correct language helps YouTube understand your video’s content and reach the appropriate audience. You can also add Subtitles or Closed Captions (CC) to make your video accessible to a wider audience, including viewers who are deaf or hard of hearing, or those who speak different languages. While Closed Captions are optional for most content, they are legally required in certain circumstances, such as for videos that have aired on US television after September 30, 2012.
Recording date and Location
The Recording date and Location fields are optional but can provide additional context for your viewers. You can choose to add the date when your video was recorded and the location where it was filmed. This information can be particularly relevant for vlogs, travel videos, or time-sensitive content.
License and Distribution
The License and Distribution section offers two license options: Standard YouTube License and Creative Commons - Attribution. The Standard YouTube License grants you exclusive broadcasting rights to YouTube and is the default option. Creative Commons - Attribution allows others to reuse your work, provided they give you attribution. Choose the license that best suits your intentions for your video’s usage rights. The Embedding option allows you to control whether others can embed your video on their websites. By default, embedding is enabled. The “Publish to subscriptions feed and notify subscribers” option, when checked, ensures that your subscribers are notified when you upload a new video. It is generally recommended to keep this option checked to maximize viewership upon upload.
Category
The Category section helps YouTube categorize your video, making it easier for viewers to find content within specific genres. Select the most appropriate category for your video from the dropdown menu. Categories range from “Film & Animation” and “Music” to “Education,” “Science & Technology,” and “People & Blogs,” among others. Choosing the correct category enhances discoverability within related content sections on YouTube.
Comments and Rating
The Comments and Rating section allows you to manage viewer interaction with your video. You can control Comment visibility by choosing options such as “Allow all comments,” “Hold potentially inappropriate comments for review,” or “Disable comments.” Selecting “Allow all comments” fosters open engagement, while “Hold potentially inappropriate comments for review” provides a moderation layer. “Disable comments” turns off commenting entirely. You can also choose how comments are Sorted by, such as “Top comments” or “Newest first.” The “Show how many viewers like and dislike this video” option, when checked, publicly displays the like and dislike counts on your video.
Video Elements: The Elements Tab
After customizing the details in the Details tab, click NEXT to proceed to the Video elements tab. This section offers optional enhancements to your video to increase viewer engagement and channel growth.
End screen
An End screen is a visual element that appears in the last 5-20 seconds of your video. It can be used to promote related videos, playlists, your channel’s subscribe button, or external websites. End screens encourage viewers to continue engaging with your content after the video ends. You can customize the elements displayed on your end screen and their placement.
Cards
Cards are interactive notifications that appear during your video. They can be used to link to other videos, playlists, channels, or external websites. Cards are a subtle way to direct viewers to additional content without interrupting the viewing experience. You can add multiple cards to your video and specify when they appear.
Visibility: The Visibility Tab
Click NEXT again to arrive at the final tab, Visibility. This tab determines who can view your video and when it becomes available.
Save or publish
In the Visibility window, you have several options for making your video accessible to viewers.
Public
Selecting Public makes your video viewable to everyone on YouTube and searchable by anyone. This is the most common visibility setting for content creators who want their videos to reach the widest possible audience.
Private
Choosing Private restricts video access to only yourself and people you specifically choose. Private videos are not searchable by others on YouTube and are ideal for personal videos or content you only want to share with a limited group.
Unlisted
Unlisted videos are not publicly searchable on YouTube, but anyone with the video link can view them. This option is useful for sharing videos with specific individuals or embedding them on websites without making them publicly discoverable on YouTube.
Set as Instant Premiere
The Set as Instant Premiere option allows you to schedule your video to be released as a premiere. A premiere creates a live viewing experience for your video, allowing you and your viewers to watch it together in real-time and interact in the live chat.
Schedule
The Schedule option allows you to set a future date and time for your video to be published. Scheduling is beneficial for planning content releases and maintaining a consistent upload schedule. Choose your desired date and time, and your video will be automatically published at the scheduled time.
Once you have configured your desired visibility settings, click SAVE (or SCHEDULE if you chose to schedule your video). Your video is now successfully uploaded to your YouTube channel and will be visible according to the visibility settings you selected.
How to Delete a YouTube Video
Occasionally, you may need to remove a video from your YouTube channel. YouTube provides a straightforward process for deleting videos permanently. It is crucial to understand that deleting a YouTube video is permanent and cannot be undone. Ensure you are certain about your decision before proceeding with deletion.
Accessing YouTube Studio
To delete a video, you need to access YouTube Studio. YouTube Studio is the central hub for managing your YouTube channel. To access it, click on your profile icon in the top right corner of the YouTube page. From the dropdown menu, select YouTube Studio. This will take you to the YouTube Studio dashboard.
Deleting the Video
In YouTube Studio, navigate to the Content section in the left-hand menu. This section displays a list of all the videos you have uploaded to your channel. Locate the video you wish to delete from the list. Hover your mouse over the video thumbnail or title, and you will see several icons appear, including Options represented by Three Dots (…). Click on these Three Dots to open a dropdown menu of options for that specific video.
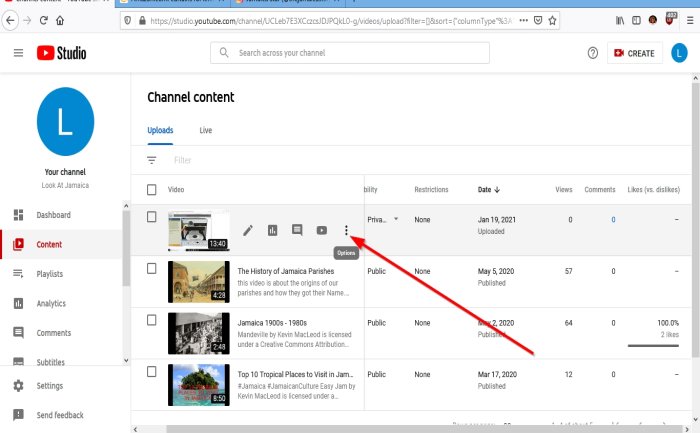
From the dropdown menu, select Delete Forever. A confirmation window will appear, reiterating that deletion is permanent and irreversible. To proceed with deletion, you must acknowledge this by checking the checkbox next to “I understand that deleting is permanent and can’t be undone.” After checking the box, the DELETE FOREVER button at the bottom of the window will become active. Click DELETE FOREVER to permanently remove the video from your YouTube channel. The video will be deleted immediately and will no longer be accessible to viewers.
Do you have any questions about uploading or deleting videos on YouTube? Share your thoughts in the comments below!
Post a Comment