Microsoft Edge Data Directory Error: Users Report Read and Write Issues
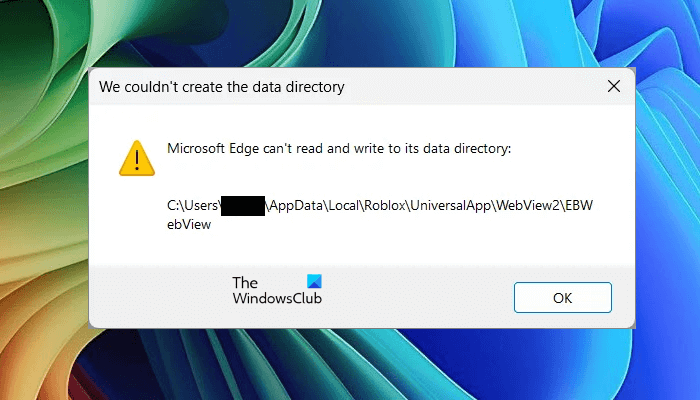
Encountering the error message “Microsoft Edge can’t read and write to its data directory” while attempting to install or run an application on your Windows 11 or Windows 10 system can be a frustrating experience. This error signals a problem with accessing necessary files and folders, often hindering the proper functioning of the application. Fortunately, this issue is frequently linked to the Microsoft Edge WebView2 Runtime, a component that enables web-based features within various applications, including some from Microsoft and third-party developers. Understanding the root cause and applying the correct troubleshooting steps can resolve this error and restore your application’s functionality.
Understanding the “Microsoft Edge can’t read and write to its data directory” Error
The error message, “Microsoft Edge can’t read and write to its data directory,” clearly points towards a permissions or access problem. Specifically, it indicates that the application trying to run or install lacks the necessary permissions to read from or write to a specific data directory. This directory is crucial for the application to store configuration files, temporary data, and other essential information required for its operation. Since this error is tied to the Microsoft Edge WebView2 Runtime, it commonly surfaces in applications that rely on this runtime for their web-related features. You may encounter this error during the initial launch of an application, during the installation process, or even while using certain games like Roblox, which leverages WebView2.
To effectively address this error, a systematic approach is necessary. The following solutions are designed to tackle different potential causes of the “Microsoft Edge can’t read and write to its data directory” error, ranging from simple permission adjustments to more comprehensive measures like reinstalling the WebView2 Runtime.
Troubleshooting Solutions to Fix the Data Directory Error
Here are several methods you can employ to resolve the “Microsoft Edge can’t read and write to its data directory” error. It is recommended to try these solutions in the order presented, as they progress from the simplest and most common fixes to more involved procedures.
1] Run the Required Program as an Administrator
Insufficient user privileges are a frequent culprit behind access-related errors in Windows. Many applications, especially installers and system-level tools, require administrator rights to function correctly. Running the affected program with administrator privileges can often bypass permission restrictions and resolve the data directory error.
Steps to Run as Administrator:
- Locate the executable file (.exe) of the program that is triggering the error. This could be the installer file or the main application executable.
- Right-click on the executable file.
- From the context menu, select Run as administrator.
- If prompted by User Account Control (UAC), click Yes to grant administrator permissions.
- Attempt to run or install the program again to see if the error persists.
By running the program as an administrator, you are essentially granting it elevated permissions, which may be necessary to access and modify the data directory it requires. If this simple step resolves the issue, it indicates that the original problem was indeed related to insufficient privileges.
2] Repair Microsoft Edge WebView2 Runtime
Since the “Microsoft Edge can’t read and write to its data directory” error is closely linked to the Microsoft Edge WebView2 Runtime, repairing this component is a logical troubleshooting step. The repair process can fix corrupted or missing files within the WebView2 Runtime installation, which might be causing the access issues.
Steps to Repair Microsoft Edge WebView2 Runtime:
- Open Windows Settings. You can do this by pressing the Windows key + I or by searching for “Settings” in the Start Menu.
- Navigate to Apps and then click on Installed apps (or Apps & features in older versions of Windows 10).
- In the app list, use the search bar to find “Microsoft Edge WebView2 Runtime”.
- Once you locate it, click on the three dots (ellipsis) next to “Microsoft Edge WebView2 Runtime”.
- From the dropdown menu, select Modify. If “Modify” is not available, look for “Advanced options” and then potentially find a “Repair” option within those settings. In some cases, “Modify” will directly lead to the repair option.
- In the window that appears, you may see a Repair button directly. Click on Repair.
- If prompted by User Account Control (UAC), click Yes to allow the repair process to proceed.
- Wait for the repair process to complete. This may take a few minutes.
- After the repair is finished, restart your computer.
- Try running the application that was previously displaying the error to check if the issue is resolved.
The repair function of Microsoft Edge WebView2 Runtime is designed to fix common installation problems without completely uninstalling and reinstalling the component. It often replaces corrupted files and corrects configuration issues, which can be effective in resolving the data directory access error.
3] Log Out from All Other User Accounts (If Applicable)
In a multi-user environment on Windows, conflicts can sometimes arise if multiple user accounts are simultaneously active. If you have multiple user accounts on your system and more than one is logged in concurrently, it’s possible that resource contention or permission conflicts are contributing to the data directory error. Logging out of all other user accounts, except for the one you are currently using, can eliminate these potential conflicts.
Steps to Log Out of Other User Accounts:
- Open Task Manager. You can do this by pressing Ctrl + Shift + Esc or by right-clicking on the Taskbar and selecting “Task Manager”.
- In Task Manager, go to the Users tab.
- Check if there are multiple user accounts listed as “Active” or “Connected”.
- If you see more than one active user account besides your own, right-click on each of the other user accounts.
- Select Sign off from the context menu. This will log out the selected user account.
- Repeat step 5 for all other active user accounts except your current one.
- Once you have logged out of all other user accounts, try running the application again to see if the error is resolved.
By ensuring that only one user account is active, you isolate the system resources and permissions to your current session. This can prevent potential interference from other user profiles and resolve conflicts that might be causing the data directory access error.
4] Check the Permissions of the Required Folder
The error message itself often provides valuable clues by indicating the specific folder that the application is unable to access. The “Microsoft Edge can’t read and write to its data directory” error usually includes a path to the problematic folder. Checking and adjusting the permissions of this folder to grant your user account the necessary access rights is a crucial step in resolving the error.
Steps to Check and Modify Folder Permissions:
- Note down the folder path mentioned in the error message. This path will lead you to the folder that the application is having trouble accessing. For example, the error message in the provided image points to an “Autodesk” folder.
- Open File Explorer and navigate to the folder path identified in the error message.
- Right-click on the folder.
- Select Properties from the context menu.
- In the Properties window, go to the Security tab.
- Under the “Group or user names” section, look for your username. If your username is not listed, click on Edit and then Add. Type your username in the “Enter the object names to select” field and click “Check Names” and then “OK”.
- Select your username from the list.
- In the “Permissions for [Your Username]” section below, check the permissions. You need to ensure that at least Read & execute, List folder contents, Read, and Write permissions are allowed. For troubleshooting purposes, granting Full Control can be helpful.
- If the necessary permissions are not checked under the “Allow” column, click on Edit.
- Select your username again.
- Check the Full Control checkbox under the “Allow” column. This will automatically select all other necessary permissions.
- Click Apply and then OK to save the changes.
- Click OK to close the folder Properties window.
- Try running the application again to see if the error is resolved.
Granting Permissions to “Everyone” (If Specific User Permission Fails):
If granting permissions to your specific username does not resolve the issue, you can try granting Full Control permissions to the “Everyone” group as a more general approach for troubleshooting. However, it’s important to note that granting broad permissions like “Full Control” to “Everyone” should be considered a temporary troubleshooting step and may not be ideal for long-term security. If this resolves the error, you may want to investigate more specific permission settings later.
Steps to Grant Permissions to “Everyone”:
- Follow steps 1-5 from the “Steps to Check and Modify Folder Permissions” section above to access the folder’s Security settings.
- In the “Group or user names” section, click on Edit.
- Click on Add.
- In the “Enter the object names to select” field, type “Everyone” and click “Check Names” and then “OK”.
- Select “Everyone” from the list.
- Check the Full Control checkbox under the “Allow” column.
- Click Apply and then OK to save the changes.
- Click OK to close the folder Properties window.
- Try running the application again.
By adjusting the folder permissions, you are directly addressing the core issue of access restrictions. Ensuring that your user account (or “Everyone” as a broader measure) has the necessary read and write permissions to the data directory is often the key to resolving the “Microsoft Edge can’t read and write to its data directory” error.
5] Reinstall Microsoft Edge WebView2 Runtime
If repairing the Microsoft Edge WebView2 Runtime does not resolve the error, a complete reinstallation might be necessary. Reinstalling the WebView2 Runtime ensures a fresh installation, replacing any potentially corrupted files or configurations that might be causing the problem.
Steps to Reinstall Microsoft Edge WebView2 Runtime:
-
Uninstall Microsoft Edge WebView2 Runtime:
- Open Windows Settings (Windows key + I).
- Go to Apps and then Installed apps.
- Search for “Microsoft Edge WebView2 Runtime”.
- Click on the three dots (ellipsis) next to “Microsoft Edge WebView2 Runtime”.
- Select Uninstall.
- Confirm the uninstallation when prompted.
- Restart your computer after uninstallation is complete.
-
Download and Install the Latest Version:
- Open a web browser and go to the official Microsoft Edge WebView2 download page: https://developer.microsoft.com/en-us/microsoft-edge/webview2/
- Look for the download link for the Evergreen Bootstrapper or Evergreen Standalone Installer under the “Download WebView2 Runtime” section. The Evergreen Bootstrapper is generally recommended as it ensures the WebView2 Runtime is always kept up-to-date.
- Download the appropriate installer (usually the x64 version for 64-bit Windows systems).
- Run the downloaded installer file.
- Follow the on-screen instructions to complete the installation.
- Restart your computer after installation.
-
Test the Application:
- After reinstalling and restarting, try running the application that was previously displaying the error. Check if the “Microsoft Edge can’t read and write to its data directory” error is resolved.
Reinstalling the Microsoft Edge WebView2 Runtime effectively replaces the entire component, addressing potential deep-seated issues that repair might not fix. This is a more comprehensive solution to ensure a clean and functional WebView2 Runtime environment.
6] Disable Your Antivirus Software (Temporarily)
In some instances, overly aggressive antivirus software can mistakenly flag legitimate applications or installers as potential threats. This can lead to interference with file access and prevent applications from running correctly, potentially triggering the “Microsoft Edge can’t read and write to its data directory” error. Temporarily disabling your antivirus software can help determine if it is the source of the problem.
Steps to Temporarily Disable Antivirus:
- Locate the antivirus icon in your system tray (usually in the bottom-right corner of your screen).
- Right-click on the antivirus icon.
- Look for an option to disable, turn off, or exit the antivirus. The exact wording will vary depending on your antivirus software.
- Select the option to disable the antivirus. You may be asked to confirm the duration for which you want to disable it. Choose a short period, like 15-30 minutes, for testing purposes.
- Important Security Note: Disabling your antivirus software makes your system more vulnerable to threats. Only disable it temporarily for testing, and re-enable it immediately after you are done testing.
- After disabling the antivirus, try running the application that was causing the error.
- Check if the “Microsoft Edge can’t read and write to its data directory” error is resolved.
If Disabling Antivirus Resolves the Error:
If the error disappears after disabling your antivirus, it indicates that your antivirus software is indeed interfering with the application. In this case, you should re-enable your antivirus immediately. To prevent future conflicts, you need to whitelist or add an exception for the affected application in your antivirus settings. This tells the antivirus to ignore or allow the specific application and prevent it from being blocked in the future. Refer to your antivirus software’s documentation for instructions on how to add exceptions or whitelist applications.
If Disabling Antivirus Does Not Resolve the Error:
If the error persists even after disabling your antivirus, then it is unlikely that your antivirus is the cause of the problem. Re-enable your antivirus software and continue troubleshooting with the other solutions provided.
Addressing 403 Forbidden Errors in Microsoft Edge
While not directly related to the data directory error, users sometimes encounter other issues with Microsoft Edge, such as the 403 Forbidden error when browsing websites. It’s important to understand that the 403 Forbidden error is a server-side error, meaning the problem lies with the website you are trying to access, not primarily with your browser.
How to Fix 403 Forbidden Error on Microsoft Edge?
The 403 Forbidden error indicates that the server understands your request, but it refuses to authorize access to the requested resource. This can happen for various reasons, including:
- Page Removal: The website administrator may have removed the specific web page you are trying to access.
- Incorrect URL: You might have typed the website address (URL) incorrectly. Double-check the URL for typos.
- Permission Restrictions: The website administrator may have restricted access to the page, and you might not have the necessary permissions to view it.
- Expired SSL Certificate: An expired SSL certificate on the website can sometimes lead to 403 errors.
- Website Issues: Temporary server problems or misconfigurations on the website can also cause 403 errors.
Troubleshooting Steps for 403 Forbidden Errors (Client-Side):
While you cannot directly fix server-side issues, you can try these client-side steps:
- Check the URL: Ensure you have entered the website address correctly.
- Clear Browser Cache and Cookies: Clearing your browser’s cache and cookies can sometimes resolve temporary website issues. In Microsoft Edge, you can do this by going to Settings > Privacy, search, and services > Clear browsing data.
- Try a Different Browser: Try accessing the website using a different web browser to see if the issue is specific to Microsoft Edge.
- Contact Website Administrator: If the error persists across browsers, the most effective solution is to contact the website administrator or support team. They are the ones who can investigate and fix server-side issues causing the 403 Forbidden error.
How Do I Disable 403 Forbidden?
You cannot disable the 403 Forbidden error as a user. It is a server-controlled response, and you do not have the authority to override website access restrictions. The 403 Forbidden error is a deliberate response from the web server indicating that access is denied. Your role as a user is to identify potential client-side issues (like incorrect URLs or browser cache) and, if those are not the cause, to contact the website administrator to report the problem. Only the website administrator can resolve the underlying server-side issues that are causing the 403 Forbidden error.
By systematically working through these troubleshooting steps, you should be able to effectively resolve the “Microsoft Edge can’t read and write to its data directory” error and restore the functionality of your applications. Remember to proceed methodically and test after each solution to pinpoint the exact cause and the successful fix.
If you continue to experience issues or have further questions, feel free to leave a comment below. Your experiences and questions can help others facing similar challenges!
Post a Comment