Customize Your Excel: Mastering the Default Number of Worksheets in New Workbooks
Microsoft Excel stands as a cornerstone application for professionals and individuals alike, adept at handling numerical data, creating insightful reports, and managing complex datasets. Its versatility extends from simple invoice generation to intricate financial modeling. Whether utilized in its desktop iteration or the online version, Excel’s fundamental structure revolves around workbooks and worksheets. Upon opening a new Excel workbook, users are typically greeted with a single worksheet, a convention that, while standard, might not always align with specific workflow needs.
For scenarios demanding multiple worksheets from the outset, such as compiling comprehensive student reports or organizing multifaceted projects, the default single-sheet setting can become a minor impediment. While adding new worksheets is a straightforward process involving clicking the “New Sheet” button, repeatedly doing so can be time-consuming, particularly when dealing with projects requiring numerous sheets. Fortunately, Excel offers a customization feature that allows users to modify the default number of worksheets in new workbooks, streamlining the initial setup process and enhancing efficiency.
How to Change the Default Number of Worksheets in Excel
The capability to adjust the default number of worksheets is conveniently integrated into the desktop version of Microsoft Excel. It is important to note that this particular customization is not available within Excel Online. Therefore, the subsequent steps are specifically tailored for the Excel desktop application.
To modify the default number of worksheets that appear when you create a new Excel workbook, adhere to the following step-by-step guide:
-
Initiate Excel and Access the File Menu: Begin by launching the Microsoft Excel application on your computer. Once Excel is open, navigate to the top-left corner of the Excel window and click on the File menu. This action will unveil a dropdown menu presenting various options.
-
Navigate to Excel Options: Within the File menu, locate and select Options near the bottom of the list. Clicking on Options will open the Excel Options dialog box, a central hub for customizing Excel’s behavior and settings.
-
Ensure General Tab Selection: In the Excel Options dialog box, verify that the General tab is selected on the left-hand side. The General tab encompasses a wide array of fundamental Excel settings, including those related to workbook creation and user interface preferences.
-
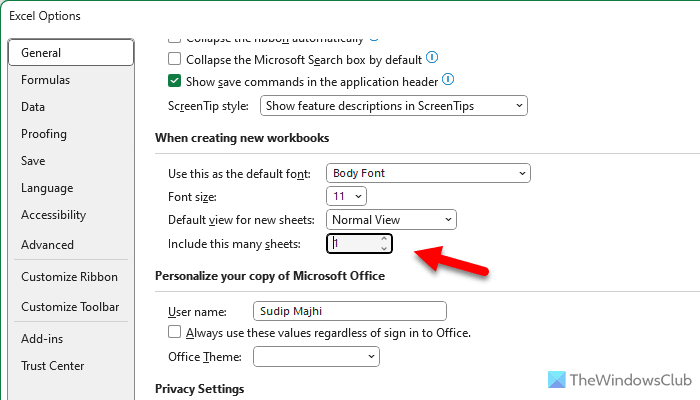
Locate “When creating new workbooks” Section: Scroll down within the General tab until you find the section labeled When creating new workbooks. This section specifically governs settings that apply to newly created Excel workbooks.
-
Find “Include this many sheets” Option: Within the “When creating new workbooks” section, identify the option titled Include this many sheets. This setting directly controls the default number of worksheets included in each new workbook.
-
Specify the Desired Number of Worksheets: To change the default, replace the existing number (which is typically ‘1’) with your desired number of worksheets. You can enter any integer from 1 to 255. This range provides considerable flexibility, accommodating a wide spectrum of project needs. For instance, if you frequently work with reports requiring five worksheets, entering ‘5’ will ensure that every new workbook starts with five sheets.
-
Confirm Changes by Clicking “OK”: After entering your preferred number of worksheets, click the OK button located at the bottom of the Excel Options dialog box. This action saves your changes and closes the dialog box.
To ensure these changes take effect, it is essential to restart your Excel application. Close Excel completely and then reopen it. Upon launching Excel and creating a new blank workbook (by selecting ‘Blank workbook’), you will observe that the new workbook now contains the default number of worksheets you specified in the Options settings.
It is crucial to remember that this customization applies solely to blank workbooks created from scratch. This setting does not influence workbooks created from templates. Templates often have predefined structures, including a specific number of worksheets, which override the default worksheet setting. To utilize the customized default worksheet number, always choose the ‘Blank workbook’ option when initiating a new Excel file.
Why Customize the Default Number of Worksheets?
Customizing the default number of worksheets in Excel offers several advantages, primarily centered around enhancing workflow efficiency and reducing repetitive tasks. Consider these scenarios where adjusting this setting proves particularly beneficial:
-
Project-Based Work: For projects structured across multiple worksheets – for example, a financial analysis project with separate sheets for income statements, balance sheets, cash flow statements, and supporting schedules – setting the default to the required number of sheets at the start saves time. Instead of manually inserting sheets every time a new project workbook is created, the necessary structure is immediately available.
-
Reporting and Data Consolidation: Many reporting tasks necessitate multiple worksheets to organize data by category, department, or time period. If your routine involves creating monthly reports with, say, four standard worksheets for different data breakdowns, pre-setting Excel to open with four worksheets will streamline your monthly report generation process.
-
Team Collaboration Templates: While the default setting doesn’t apply to templates directly, understanding this customization is useful when creating templates for teams. You can build a template with the optimal number of worksheets for a typical team project, ensuring consistency and ease of use for all team members. While users won’t automatically get more sheets than the template provides, the understanding of worksheet management is still valuable.
-
Personal Workflow Optimization: Ultimately, customizing Excel settings is about tailoring the application to individual work habits. If your personal workflow consistently involves workbooks with more than one worksheet, changing the default is a simple yet effective way to personalize Excel and reduce minor, repetitive actions that accumulate over time.
Step-by-Step Visual Guide
To further clarify the process, here’s a summarized step-by-step guide in a more visually accessible format:
-
Open Excel and Click “File”:
-
Select “Options”:
-
Go to “General” Tab:
-
Find “When creating new workbooks” and “Include this many sheets”:
-
Enter Desired Number (1-255) and Click “OK”:
-
Restart Excel: Close and reopen Excel for changes to apply.
Can you change the number of default worksheet tabs?
Yes, absolutely. Changing the default number of worksheet tabs is precisely what this customization achieves. While Excel initially presents a single worksheet tab upon opening a new workbook, you possess the capability to modify this default to any number within the range of 1 to 255. This adjustment is made through the Excel Options panel, specifically within the General tab, by locating the “Include this many sheets” setting.
By altering this setting and restarting Excel, every new blank workbook you create will automatically display the pre-defined number of worksheet tabs. This eliminates the need to manually insert additional worksheets each time you begin a new project that requires a multi-sheet structure. It’s a direct and efficient way to tailor Excel’s initial behavior to your typical workflow requirements.
How do I increase the number of worksheets in a workbook?
As previously mentioned, Excel’s default behavior is to present a single worksheet in each newly created workbook. However, increasing the number of worksheets beyond this default, either for new workbooks or within existing ones, is readily achievable.
For New Workbooks (Default Setting): To increase the default number of worksheets for all new workbooks, follow the steps outlined earlier:
- Navigate to File > Options.
- Ensure you are in the General tab.
- Locate the “When creating new workbooks” section and the “Include this many sheets” setting.
- Enter your desired number of worksheets (from 1 to 255) in the provided box.
- Click OK.
- Restart Excel.
For Existing Workbooks (Adding Worksheets Manually): To add worksheets to a workbook that is already open, or if you need to add more sheets beyond the default setting in a new workbook, you can do so manually:
-
Using the “New Sheet” Button: Look for the “+” symbol, typically located to the right of the last worksheet tab at the bottom of the Excel window. Clicking this “+” button will instantly insert a new worksheet into your workbook. You can click this button as many times as needed to add multiple worksheets.
-
Right-Clicking on a Worksheet Tab: You can also right-click on any existing worksheet tab. In the context menu that appears, select “Insert…”. This will open the “Insert” dialog box. Ensure “Worksheet” is selected (it usually is by default) and click “OK”. This will insert a new worksheet before the worksheet tab you right-clicked on.
-
Using Keyboard Shortcut: The keyboard shortcut Shift + F11 provides a quick way to insert a new worksheet. Pressing these keys simultaneously will immediately add a new worksheet to your workbook.
By employing these methods, you can easily increase the number of worksheets within any Excel workbook, whether you are adjusting the default for future workbooks or adding sheets to a workbook you are currently working on. Mastering these techniques empowers you to structure your Excel files effectively and efficiently manage your data across multiple worksheets.
Feel free to share your experiences with customizing Excel’s default worksheet settings or any other Excel tips you find helpful in the comments below!
Post a Comment