Seamlessly Transfer Contacts: A Guide to Importing People App Data into Microsoft Outlook
Transferring your contacts from one platform to another can often feel like a daunting task. However, migrating your contact data from the Windows People App to Microsoft Outlook is a straightforward process designed to be user-friendly. This guide will walk you through the necessary steps to seamlessly import your contacts into Outlook, ensuring no valuable information is lost in the transition. This process is applicable for various versions of Outlook, including Outlook 2019, 2016, and 2013, making it a versatile solution for users across different setups.
Importing Contacts from People App to Outlook: A Step-by-Step Guide
To begin the process of importing your contacts, ensure that you have already exported your contacts from the People App as a .CSV file. This crucial first step, detailed in a previous guide, prepares your data for a smooth transition into Outlook. With your .CSV file ready, follow these instructions to import your contacts into the Outlook application.
Step 1: Accessing the Import/Export Wizard in Outlook
First, ensure that your Microsoft Outlook application is open. Once Outlook is running, navigate to the File tab located in the top left corner of the Outlook window. Clicking on File will open a menu with various options. From this menu, select Open & Export. In the Open & Export pane that appears on the right side of the Outlook window, you will find the Import/Export option. Click on Import/Export to initiate the Import and Export Wizard. This wizard is your central tool for transferring data into or out of Outlook.
Step 2: Selecting the Import Action
The Import and Export Wizard dialog box will now appear, presenting you with a list of actions. To import your contacts, choose the option Import from another program or file. This selection indicates that you are bringing data into Outlook from an external source, in this case, your .CSV file exported from the People App. After selecting Import from another program or file, click the Next button to proceed to the next step in the import process.
Step 3: Choosing the File Type: Comma Separated Values
In the subsequent step of the wizard, you will be prompted to specify the type of file you are importing. Since your contacts are saved in a .CSV (Comma Separated Values) file, select the Comma Separated Values option from the list provided. This tells Outlook that the data is structured in a comma-delimited format, which is essential for correctly interpreting the information within your file. Once you have selected Comma Separated Values, click Next to move forward in the import process.
Step 4: Specifying the .CSV File to Import
Now, you need to tell Outlook where to find the .CSV file containing your exported contacts. Click on the Browse button. This will open a file explorer window, allowing you to navigate your computer’s file system. Locate the .CSV file that you saved earlier (presumably on your Desktop or another easily accessible location). Select the .CSV file and click Open. The path to your selected .CSV file will now be displayed in the wizard.
Below the file selection area, you will find Options for handling duplicate contacts. You have three choices:
- Replace duplicates with items imported: If a contact in your .CSV file matches an existing contact in Outlook, the imported contact will overwrite the existing one.
- Allow duplicates to be created: If a contact in your .CSV file matches an existing contact in Outlook, both contacts will be kept, resulting in duplicate entries.
- Do not import duplicate items: If a contact in your .CSV file matches an existing contact in Outlook, the duplicate contact from the .CSV file will be skipped and not imported.
Choose the option that best suits your needs for managing duplicate contacts. After selecting your preferred option, click Next to continue.
Step 5: Selecting the Destination Folder for Contacts
In this step, you need to specify where in Outlook you want to import your contacts. Typically, Outlook will default to selecting the Contacts folder as the destination. You should see Contacts highlighted in the folder list. If it is not selected, or if you wish to import your contacts into a different folder, scroll through the list of folders until you find the desired destination. Select the Contacts folder (or your chosen destination folder) and then click Next.
Step 6: Verifying the Import Action and Preparing for Mapping
The wizard will now display a summary of the import action you are about to perform. It will show a checkbox next to the action, which might read something like Import “MyContacts.csv” into folder: Contacts. Ensure that this checkbox is selected, confirming that you intend to import the specified .CSV file into your chosen contacts folder.
Before clicking Finish, it is highly recommended to pause and consider mapping your custom fields. Mapping fields is a critical step that ensures the columns from your .CSV file are correctly aligned with the corresponding contact fields in Outlook. Proper mapping is essential for accurate and organized contact information within Outlook.
Step 7: Mapping Custom Fields (Optional but Recommended)
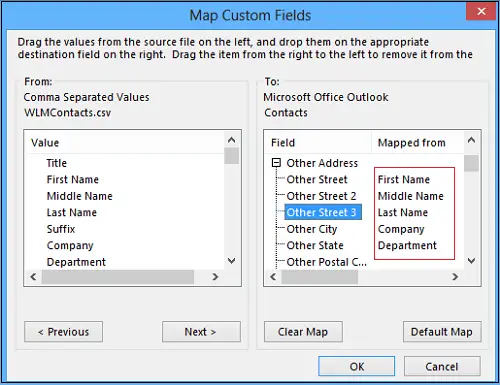
Click the Map Custom Fields button. This will open the Map Custom Fields dialog box, which is where you will align the columns from your .CSV file with Outlook’s contact fields.
In the Map Custom Fields dialog box, you will see two panes:
- From (Left Pane): This pane displays the column headers from your .CSV file. These are the categories of information in your contact data, such as “Name,” “Email Address,” “Phone Number,” etc.
- To (Right Pane): This pane shows the standard contact fields used by Outlook. These are the predefined categories within Outlook contacts, like “First Name,” “Last Name,” “Business Phone,” “Mobile Phone,” “Email,” “Address,” and many more.
Outlook attempts to automatically map fields if it finds exact matches between the column names in your .CSV file and its own contact fields. Mapped fields will be indicated under the Mapped from column in the “To” pane. However, it is common for some fields to require manual mapping, especially if column names in your .CSV file are not identical to Outlook’s field names.
Performing Manual Mapping:
To manually map a field, locate the column name from your .CSV file in the left pane that you want to map. Then, find the corresponding Outlook contact field in the right pane. For example, if your .CSV file has a column named “Cell Ph.” for mobile phone numbers, you might need to scroll down in the right pane under Other Address and expand it by clicking the plus sign (+). You should then find a field like Mobile Phone.
To create the mapping, simply drag the column name from the left pane (e.g., “Cell Ph.”) and drop it onto the appropriate Outlook field in the right pane (e.g., “Mobile Phone”). Once you drop, the mapping will be established, and you will see the CSV column name appear under “Mapped from” next to the Outlook field.
Repeat this drag-and-drop process for all the columns from your .CSV file that you want to import and map to corresponding Outlook contact fields. Ensure that you map as many relevant fields as possible to maintain the integrity and organization of your contact data within Outlook.
Importance of Mapping:
Proper field mapping is crucial because it dictates how your contact information is structured and displayed in Outlook. If you skip or incorrectly perform mapping, contact details might end up in the wrong fields in Outlook, making it difficult to find and use your contacts effectively. For example, if you fail to map the “Email Address” column correctly, email addresses might be imported into the “Notes” field, rendering them unusable for sending emails.
After you have completed mapping all the desired fields, click OK in the Map Custom Fields dialog box to save your mappings and close the dialog.
Step 8: Finalizing the Import Process
With field mapping complete (or if you chose to skip mapping), you are now ready to finalize the import process. Click the Finish button in the Import and Export Wizard dialog box. Outlook will now begin importing your contacts from the specified .CSV file into the selected destination folder.
The time taken for the import process will depend on the size of your .CSV file and the number of contacts being imported. Once the import is complete, you will find your contacts from the People App successfully transferred and available in your Outlook Contacts.
Post-Import Verification and Contact Management
After importing your contacts, it is a good practice to verify that the import was successful and that your contact information is correctly displayed in Outlook. Browse through your contacts in Outlook to ensure that names, email addresses, phone numbers, and other details have been imported accurately and are placed in the correct fields.
If you chose to map custom fields, double-check that the mapped fields are displaying correctly in the corresponding Outlook contact fields. If you find any discrepancies or errors, you may need to repeat the import process, paying closer attention to the field mapping step. You can also edit individual contacts within Outlook to correct any minor issues.
With your contacts now in Outlook, you can take advantage of Outlook’s comprehensive contact management features, such as creating contact groups, categorizing contacts, and integrating contacts with other Outlook features like email and calendar.
Important Note Regarding People App
It is worth noting that the People app in Windows has evolved. It no longer exists as a standalone application in the Start Menu in newer versions of Windows. Instead, it is now integrated as a core component of the Mail and Calendar apps. You can still manage your contacts through the People icon or button within the Mail and Calendar applications. This integration ensures that your contact management remains accessible and synchronized within the broader Windows ecosystem, even though the standalone People app is no longer present.
By following these steps, you can efficiently and effectively import your contacts from the People App into Microsoft Outlook, ensuring a smooth transition and continued access to your valuable contact information within the Outlook environment.
Do you have any questions about importing contacts to Outlook or further tips to share? Feel free to leave a comment below!
Post a Comment