Unlock VM Graphics Power: A Guide to Attaching Physical GPUs in Hyper-V
In today’s demanding computing landscape, virtual machines (VMs) are increasingly tasked with handling graphically intensive workloads. Traditional virtualized environments often rely on emulated video cards, which, while functional for basic display purposes, fall short when performance is paramount. Tasks such as advanced 3D rendering, complex simulations, machine learning computations leveraging CUDA, and even modern gaming within a virtualized environment require significant graphics processing power. To address this performance gap, Hyper-V offers a powerful feature known as GPU Passthrough, enabling you to bypass the limitations of emulated graphics and directly assign a physical video card to a virtual machine. This guide will walk you through the process of attaching a physical GPU to a VM on a Hyper-V host, unlocking the true graphics potential within your virtualized environment.
Understanding GPU Passthrough in Hyper-V
GPU Passthrough is an advanced virtualization technique that grants a virtual machine exclusive and direct access to a physical GPU installed on the host server. Unlike software-based GPU virtualization, which shares a virtualized GPU resource among multiple VMs and introduces performance overhead through emulation, GPU Passthrough eliminates this layer. By directly mapping the physical GPU to a specific VM, the virtual machine can leverage the full processing power of the dedicated graphics card as if it were physically installed within the VM itself. This direct access results in a significant performance boost for graphics-intensive applications running inside the VM, making it suitable for scenarios where high-fidelity visuals and rapid processing are critical.
This feature is particularly beneficial for professionals and enthusiasts who require high-performance graphics within a virtualized environment. Consider scenarios such as game developers testing their creations across different operating systems, designers working with demanding CAD and 3D modeling software, or data scientists leveraging GPU acceleration for machine learning models. In these cases, the performance gains offered by GPU Passthrough are not just incremental improvements but can be transformative, enabling workflows that were previously impractical or impossible within a virtualized setting. Effectively, GPU Passthrough bridges the gap between the flexibility of virtualization and the raw power of dedicated hardware, providing a best-of-both-worlds solution for graphically demanding tasks.
System Requirements for GPU Passthrough
Before attempting to implement GPU Passthrough, it’s crucial to ensure that your hardware and software environment meets the necessary prerequisites. Failing to meet these requirements can lead to unsuccessful implementation or system instability. The following sections detail the hardware and software components that must be in place for successful GPU Passthrough in Hyper-V.
Hardware Requirements
To effectively utilize GPU Passthrough, several key hardware components must support virtualization technologies. These technologies enable the host system to isolate and securely assign hardware resources, including GPUs, to virtual machines.
-
CPU Virtualization Support: Your host system’s processor must support hardware virtualization extensions. For Intel processors, this is known as Intel-VT (Virtualization Technology), and for AMD processors, it’s AMD-V. These extensions are fundamental for enabling virtualization in general and are a prerequisite for more advanced features like GPU Passthrough. You can typically verify and enable these settings within your system’s BIOS or UEFI firmware settings.
-
IOMMU Support: PCI Passthrough, the underlying mechanism for GPU Passthrough, necessitates support for an Input-Output Memory Management Unit (IOMMU) in your processor and motherboard chipset. The IOMMU acts as a virtualization extension for PCI devices, enabling secure and direct access from VMs to physical PCI hardware like GPUs. It ensures that a VM can only access the memory and resources allocated to it, preventing unauthorized access to other parts of the system.
-
GPU Virtualization Technologies: The physical GPU you intend to pass through to the VM must support GPU virtualization technologies. NVIDIA GRID and AMD MxGPU are examples of such technologies offered by leading GPU vendors. These technologies are often found in server-grade or professional-level GPUs and are designed to enhance virtualization capabilities. Consumer-grade GPUs may have varying degrees of compatibility, and it’s important to check the specifications of your specific GPU model. Older GPUs relying solely on PCI Interrupts (INTx) are generally incompatible with modern GPU Passthrough implementations. Server-class hardware often provides better success rates and more robust support for these advanced features.
-
Single Root I/O Virtualization (SR-IOV): Your system should support Single Root Input/Output Virtualization (SR-IOV). SR-IOV is a PCI Express (PCIe) standard that allows a single physical PCIe device, like a GPU, to appear as multiple separate physical devices. This enables virtualization environments to assign dedicated portions of the PCIe device’s resources directly to VMs, improving performance and reducing overhead. While not always strictly mandatory for basic GPU Passthrough, SR-IOV support can significantly enhance performance and scalability, especially in environments with multiple VMs requiring GPU access.
Software Requirements
In addition to hardware prerequisites, specific software configurations are necessary to enable and utilize GPU Passthrough in Hyper-V.
-
Operating System: The host operating system must be Windows Server 2016 or a later version, or a client operating system like Windows 11 or Windows 10. These operating systems include the necessary Hyper-V features and driver support for GPU Passthrough. Older versions of Windows Server or client operating systems may not fully support or reliably implement GPU Passthrough.
-
Hyper-V Feature: Naturally, the Hyper-V role must be enabled on the host operating system. Hyper-V is Microsoft’s hypervisor, and it’s the foundation upon which GPU Passthrough and other virtualization features are built. Enabling Hyper-V is typically a straightforward process through the Windows Server Manager or Windows Features settings.
-
VM Generation: The virtual machine intended to use GPU Passthrough must be a Generation 2 VM. Generation 2 VMs are the more modern VM architecture in Hyper-V, offering improved performance, UEFI firmware, and support for newer virtualization features, including GPU Passthrough. Generation 1 VMs, while still functional, lack the architectural underpinnings required for direct GPU assignment.
-
Updated GPU Drivers: It’s essential to ensure that all GPU drivers, both on the host operating system and within the virtual machine (after GPU Passthrough is configured), are updated to the latest versions provided by the GPU vendor (NVIDIA or AMD). Outdated or incompatible drivers can lead to instability, performance issues, or failure of GPU Passthrough to function correctly. Cleanly installing the latest drivers is a recommended best practice both before and after setting up GPU Passthrough.
Limitations of GPU Passthrough
While GPU Passthrough offers significant advantages, it also comes with certain limitations that users should be aware of before implementation. These limitations are often inherent to the nature of directly assigning hardware resources to virtual machines and can impact the overall flexibility and management of the virtualized environment.
-
Incompatibility with Dynamic Memory: Virtual machines configured for GPU Passthrough cannot utilize Dynamic Memory. Dynamic Memory is a Hyper-V feature that dynamically adjusts the amount of memory allocated to a VM based on its needs. However, due to the direct hardware assignment of the GPU, Dynamic Memory is incompatible. The VM must be configured with a fixed amount of RAM.
-
Windows Edition Restrictions: GPU Passthrough functionality is typically available only in higher-end editions of Windows Server, such as Windows Server Datacenter editions. Standard or lower editions might lack the necessary licensing or features to support GPU Passthrough. For client operating systems, it’s generally available in professional or higher editions of Windows 10 and Windows 11.
-
Potential WSL Conflicts: If Windows Subsystem for Linux (WSL) is deployed on the Hyper-V host, it can sometimes lead to conflicts and VM errors, specifically error code 43, when GPU Passthrough is in use. This is a known issue in certain configurations, and users employing WSL on the host should be aware of this potential conflict.
-
Clustering and Live Migration Limitations: Advanced Hyper-V features like high availability clustering and live VM migration are not supported for VMs utilizing GPU Passthrough. Live migration, which allows moving a running VM from one host to another without downtime, is not feasible when a physical GPU is directly attached. Similarly, VMs with GPU Passthrough cannot be part of a high availability cluster that automatically fails over VMs to another host in case of hardware failure. This is because the GPU is physically tied to the original host.
-
Checkpoint and Save/Restore Incompatibility: Save and restore operations using VM checkpoints are not supported for VMs with GPU Passthrough. Checkpoints create snapshots of a VM’s state, allowing for rollback to a previous point in time. However, due to the direct hardware access and state management complexities of GPU Passthrough, checkpoints are not compatible. Similarly, the standard VM “Save” and “Restore” operations are also not supported for these VMs.
Understanding these limitations is crucial for planning and deploying GPU Passthrough effectively. It’s important to assess whether these limitations align with your use case and operational requirements before implementing this feature.
Step-by-Step Guide to Attach a Physical GPU to a Hyper-V VM
Once you’ve confirmed that your system meets the prerequisites and you are aware of the limitations, you can proceed with setting up GPU Passthrough. The process involves several key steps, from enabling virtualization technologies in your system’s firmware to configuring Hyper-V and the virtual machine itself. The following sections provide a detailed, step-by-step guide to attaching a physical video card to a VM on a Hyper-V host using GPU Passthrough.
1] Enable Intel-VT or AMD-V Virtualization
The very first step is to ensure that hardware virtualization is enabled in your host system’s BIOS or UEFI firmware settings. This is a foundational requirement for all virtualization technologies, including GPU Passthrough.
-
Access BIOS/UEFI Settings: Restart your computer and enter the BIOS or UEFI setup utility. The key to press to enter setup varies depending on your motherboard manufacturer (often Del, F2, F10, F12, or Esc). Consult your motherboard manual or the boot-up screen for the correct key.
-
Locate Virtualization Settings: Within the BIOS/UEFI setup, navigate to the section related to CPU configuration, advanced settings, or virtualization. The exact location and naming of these settings can vary. Look for options labeled “Virtualization Technology,” “Intel VT-x,” “AMD-V,” or similar terms.
-
Enable Virtualization: Ensure that the virtualization technology setting for your CPU vendor (Intel-VT or AMD-V) is set to “Enabled.” If it is set to “Disabled,” change it to “Enabled.”
-
Save and Exit: Save the changes you’ve made in the BIOS/UEFI setup and exit. Your computer will restart.
After restarting, your system should now have hardware virtualization enabled, which is a prerequisite for the subsequent steps in configuring GPU Passthrough.
2] Configure your computer for GPU Passthrough
With hardware virtualization enabled, the next step is to configure the host operating system and Hyper-V environment specifically for GPU Passthrough. This involves verifying IOMMU support and disabling automatic checkpoints for the target VM.
-
Verify IOMMU Support: Open PowerShell as an administrator. Run the following command to check if IOMMU is enabled and functioning correctly:
(Get-VMHost).IovSupport; (Get-VMHost).IovSupportReasonsIf the output shows “True” for
IovSupport, IOMMU is enabled. If it shows “False,” you may need to enable IOMMU in your BIOS/UEFI settings. TheIovSupportReasonsoutput may provide clues if IOMMU is not enabled, such as needing to enable it in BIOS or if the hardware doesn’t support it. Enabling IOMMU in BIOS/UEFI is usually found in similar sections as the CPU virtualization settings, often labeled “IOMMU,” “VT-d” (for Intel), or “AMD-Vi” (for AMD). Enable the IOMMU setting if it is disabled, save changes, and reboot. Re-run the PowerShell command to verify after rebooting. -
Disable VM Checkpoints: GPU Passthrough is incompatible with VM checkpoints. You need to disable automatic checkpoints and remove any existing checkpoints for the VM you intend to use with GPU Passthrough.
-
List VMs: Run the following command in PowerShell to list all VMs on your Hyper-V host and identify the name of your target VM:
Get-VM -
Disable Automatic Checkpoints: Use the following command to disable automatic checkpoints for your target VM, replacing
<VMNAME>with the actual name of your VM:Set-VM -Name <VMNAME> -AutomaticCheckpointsEnabled $false -
Disable Automatic Stop Action: To further ensure compatibility and control over the VM’s state, set the automatic stop action to “TurnOff”:
Set-VM -Name <VMNAME> -AutomaticStopAction TurnOff -
Remove Existing Checkpoints: It’s also recommended to remove any existing checkpoints for the VM. You can do this through the Hyper-V Manager GUI by right-clicking on the VM, selecting “Checkpoints,” and deleting any listed checkpoints. Alternatively, you can use PowerShell commands to manage and remove checkpoints if needed.
-
3] Set up GPU Passthrough for Windows 11/10 (Client OS VMs)
If your virtual machine is running a Windows client operating system like Windows 11 or Windows 10, follow these steps to configure GPU Passthrough.
-
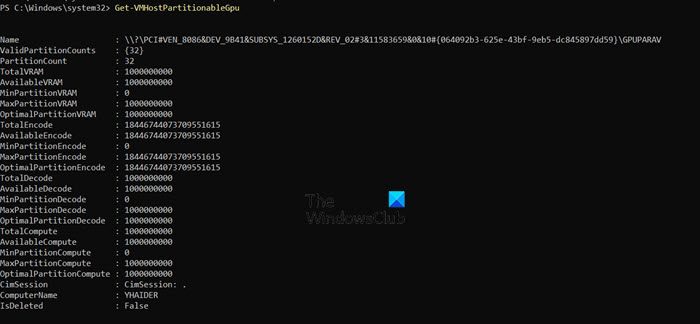
Verify GPU Partitioning Support: First, check if your video card supports GPU partitioning, which is necessary for GPU Passthrough on client OS VMs. Run the appropriate command in PowerShell on the Hyper-V host based on your host OS:
Windows 11 Host:
Get-VMHostPartitionableGpuWindows 10 Host:
Get-VMPartitionableGpuExamine the output. If your GPU is listed and shows “Partitionable” as “True,” it supports GPU Passthrough. Note the
NameandInstanceIdof your GPU from the output, as you may need this information later. -
Install Updated Graphics Drivers (on Host): Ensure you have the latest graphics drivers installed on the Hyper-V host machine for the GPU you intend to pass through. Download the drivers directly from NVIDIA or AMD’s website, specifically for your GPU model and host operating system. Perform a clean installation of these drivers.
-
Copy Graphics Drivers to VM (or Shared Location): For easier driver installation within the VM later, it’s helpful to copy the graphics driver installation files to a location accessible from within the VM. You can use a shared folder, network drive, or simply copy the files to the VM via Hyper-V Enhanced Session Mode if enabled.
-
Run GPU Partitioning Script (Optional but Recommended): A helpful script is available on GitHub (often referred to as “Easy-GPU-PV”) that can automate some driver-related steps and improve compatibility. While optional, using this script is generally recommended, especially for Windows client VMs.
-
Download the Script: Download the ZIP file from a reputable source like GitHub (search for “Easy-GPU-PV”). Extract the contents to a folder on your host machine.
-
Set Execution Policy: PowerShell execution policy might prevent running scripts. Run these commands in PowerShell as administrator to temporarily allow script execution for the current process and to set the current user policy to RemoteSigned (allowing locally created scripts and signed scripts from the internet to run):
Set-ExecutionPolicy -Scope Process -ExecutionPolicy Bypass -Force
Set-ExecutionPolicy -ExecutionPolicy RemoteSigned -Scope CurrentUser
Be mindful of the security implications of changing execution policies, and consider reverting them to more restrictive settings after you’ve completed the GPU Passthrough setup.
-
Run the Update-VMGpuPartitionDriver.ps1 Script: Navigate to the directory where you extracted the script in PowerShell. Run the script, providing the VM name and GPU name as parameters. Use “AUTO” for GPUName to let the script automatically detect the GPU. Replace
<VMNAME>with your actual VM name and adjust the path if needed:.\Update-VMGpuPartitionDriver.ps1 -VMName <VMNAME> -GPUName "AUTO"
-
-
Configure VM Memory Settings for GPU Passthrough: Set specific memory configurations for the VM to accommodate GPU Passthrough. Run these commands in PowerShell, replacing
<VMNAME>with your VM’s name:Set-VM -VMName <VMNAME> -GuestControlledCacheTypes $true -LowMemoryMappedIoSpace 1Gb -HighMemoryMappedIoSpace 32GbThese commands configure the VM’s memory mapping settings, allocating dedicated memory regions for the GPU to function correctly within the VM. The
LowMemoryMappedIoSpaceandHighMemoryMappedIoSpacevalues define the ranges of memory addresses reserved for the GPU. These values are generally suitable for most modern GPUs, but for GPUs with very large VRAM or in specific scenarios, you might need to adjust these values based on Microsoft’s recommendations or GPU vendor documentation. -
Add GPU Partition Adapter to VM: Finally, add the GPU Partition Adapter to the VM, which completes the GPU Passthrough configuration. Run this command in PowerShell, replacing
<VMNAME>with your VM’s name:Add-VMGpuPartitionAdapter -VMName <VMNAME>This command assigns the physical GPU to the specified virtual machine.
To remove GPU Passthrough from a VM later, you can use the command: Remove-VMGpuPartitionAdapter -VMName <VMNAME>.
4] Set up GPU Passthrough for Windows Server (Server OS VMs)
If your virtual machine is running a Windows Server operating system, the configuration process is slightly different. Follow these steps for server OS VMs.
-
Configure VM Memory Settings for GPU Passthrough (Server): For Windows Server VMs, use these commands in PowerShell (run as administrator) to set the memory configuration. These values are slightly different from client OS VMs and are tailored for server environments:
Set-VM -Name <VMNAME> -GuestControlledCacheTypes $True -LowMemoryMappedIoSpace 3Gb -HighMemoryMappedIoSpace 33280MbNote the adjusted values for
LowMemoryMappedIoSpace(3Gb) andHighMemoryMappedIoSpace(33280Mb). These values are generally recommended for Windows Server VMs. As mentioned earlier, for very specific or high-end GPU configurations, you might need to consult Microsoft’s documentation or use a “Machine Profile script” from Microsoft’s documentation to calculate more precise MIMO (Memory Mapped I/O) limits. -
Identify PCI Express Device Location: You need to determine the PCI Express location path of your physical GPU. Run these commands in PowerShell to find this information:
Get-PnpDevice | Where-Object {$_.Present -eq $true} | Where-Object {$_.Class -eq "Display"}|select Name,InstanceIdGet-PnpDevice -Class Display | ForEach-Object { Write-Output "$($_.FriendlyName) has a device id of $($_.DeviceId) and is located at $($_ | Get-PnpDeviceProperty DEVPKEY_Device_LocationPaths | Select-Object -ExpandProperty Data | Where-Object { $_ -like "PCIROOT*" })"; }Examine the output of these commands. Look for your GPU in the list (identified by its “FriendlyName” or “Name”). The “Location” or “LocationPaths” output will give you the PCI location path, which will look something like
PCIROOT(0)#PCI(0200). Note down this location path; you’ll need it in the following steps. -
Disable GPU Device on Host: In the Device Manager on the Hyper-V host, disable the physical GPU you intend to pass through.
- Open Device Manager (devmgmt.msc).
- Expand “Display adapters.”
- Right-click on your physical GPU.
- Select “Disable device.”
Disabling the device on the host releases it so that it can be exclusively assigned to the VM. The host system will likely revert to using the integrated graphics or another display adapter if available.
-
Dismount GPU from Host: Dismount the GPU from the host operating system using PowerShell. Run this command, replacing
"PCIROOT(0)#PCI(0200)"with the actual location path you noted earlier:Dismount-VmHostAssignableDevice -LocationPath "PCIROOT(0)#PCI(0200)" -ForceThis command prepares the GPU for assignment to the VM by detaching it from the host’s device management.
-
Assign GPU to VM: Assign the dismounted GPU to your virtual machine using the
Add-VMAssignableDevicecommand. Replace<VMNAME>with your VM’s name and"PCIROOT(0)#PCI(0200)"with the correct location path:Add-VMAssignableDevice -VMName <VMNAME> -LocationPath "PCIROOT(0)#PCI(0200)" -
Start the VM and Install Drivers: Power on your virtual machine. Once the VM is running, open Device Manager within the VM. You should see the physical video card listed, likely under “Display adapters” but possibly with a driver issue indicated (e.g., a yellow exclamation mark). Install the video card drivers within the VM. Use the driver files you copied to a shared location earlier or download the latest drivers from NVIDIA or AMD’s website from within the VM.
After installing the drivers in the VM, the physical GPU should be fully functional within the virtual machine. You can now run graphics-intensive applications and verify that they are utilizing the dedicated GPU.
Switching Back to Host GPU:
If you need to revert the GPU back to the host operating system for any reason:
- Shut down the VM. The VM must be completely powered off, not just saved or paused.
-
Remove GPU Assignment: In PowerShell on the host, run this command to remove the GPU assignment from the VM, replacing
<VMNAME>and$locationPathwith your VM name and the GPU’s location path (you can store the location path in a variable like$locationPath = "PCIROOT(0)#PCI(0200)"for convenience):Remove-VMAssignableDevice -VMName <VMNAME> -LocationPath $locationPath -
Mount GPU Back to Host: Mount the GPU back to the Hyper-V host so that it’s available to the host OS again:
Mount-VMHostAssignableDevice -LocationPath $locationPath -
Enable GPU Device on Host (if needed): If you disabled the GPU in Device Manager on the host earlier, you may need to re-enable it. Go to Device Manager, expand “Display adapters,” right-click on the GPU, and select “Enable device.”
By following these steps, you can effectively attach a physical video card to a virtual machine on a Hyper-V host, unlocking enhanced graphics capabilities for your virtualized workloads. Remember to carefully review the system requirements and limitations before implementation to ensure compatibility and suitability for your specific use case.
Do you have any questions or experiences with GPU Passthrough in Hyper-V? Share your thoughts and comments below!
Post a Comment