Windows Shortcut Secrets: Create a Desktop Icon in Windows 11/10 Like a Pro
Creating desktop shortcuts in Windows 11/10 is a fundamental skill that enhances user efficiency and accessibility. While seemingly basic, mastering shortcut creation can significantly streamline your workflow. This guide provides a comprehensive walkthrough of various methods to create desktop shortcuts for your frequently used applications, programs, websites, and files, ensuring quick and easy access directly from your desktop or any folder.
Understanding Desktop Shortcuts
A desktop shortcut is essentially a link that points to a file, folder, application, or website. Instead of navigating through directories or menus to access a specific item, a shortcut allows you to instantly open it with a simple double-click. This functionality is crucial for optimizing your Windows experience, saving time and effort in your daily tasks. Shortcuts are represented by icons, often with a small arrow overlay to distinguish them from the original item.
Method 1: The Right-Click Context Menu on Executable Files
The most direct method to create a desktop shortcut involves utilizing the right-click context menu on an executable file (.exe). This approach is particularly useful for applications and programs installed on your system. By leveraging the “Send to” option, you can quickly place a shortcut on your desktop.
Steps to Create a Shortcut from an Executable File:
- Locate the Executable File: Open File Explorer and navigate to the directory where the program’s executable file (.exe) is located. This is usually within the Program Files or Program Files (x86) folders.
- Right-Click and Show More Options: Right-click on the desired .exe file. In Windows 11, select “Show more options” from the context menu to reveal the classic context menu.
- Send To Desktop: From the expanded context menu, hover over “Send to” and then click on “Desktop (create shortcut)”.
A shortcut to the program will now be instantly created on your Windows desktop. You can then reposition this shortcut anywhere on your desktop or within other folders as needed. This method offers a swift and intuitive way to establish quick access to your applications.
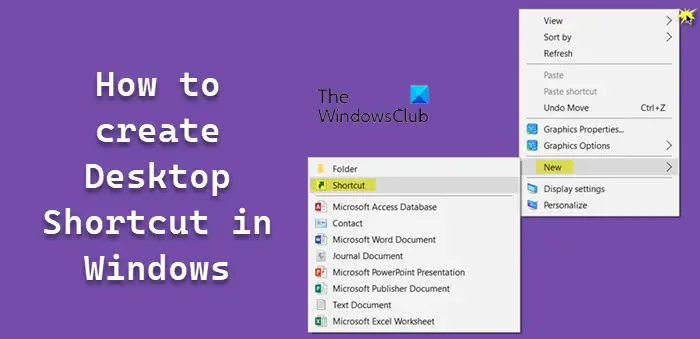
Method 2: The Right-Click Context Menu on the Desktop
Another versatile method involves right-clicking directly on the desktop to access the “New” menu. This approach is beneficial when you know the path of the file, folder, or program you want to create a shortcut for, or when you want to create a shortcut to a website.
Steps to Create a Shortcut from the Desktop Context Menu:
- Right-Click on the Desktop: Right-click on any empty space on your Windows desktop.
- Navigate to New > Shortcut: In the context menu, hover over “New” and then click on “Shortcut”. This action will open the “Create Shortcut” wizard.
- Enter the Item’s Location: In the wizard, you will be prompted to “Type the location of the item”. You can either directly type the path to the file, folder, application, or website URL. Alternatively, click the “Browse” button to locate the file or folder through File Explorer. For website shortcuts, simply enter the full URL, including “https://”.
- Click Next: Once you have entered the location, click the “Next” button.
- Name Your Shortcut: On the next screen, you will be asked to “Type a name for this shortcut”. Enter a descriptive name for your shortcut. This name will appear under the shortcut icon on your desktop.
- Click Finish: Click the “Finish” button to complete the shortcut creation process.
A new shortcut icon, bearing the name you provided, will now appear on your desktop. This method provides flexibility, accommodating shortcuts to various types of items, including files, folders, programs, and websites.
Method 3: Drag and Drop with Right-Click from File Explorer
This method combines the drag-and-drop functionality with the right mouse button to offer a quick way to create shortcuts directly from File Explorer. It is particularly useful when you are already browsing files and folders within File Explorer.
Steps to Create a Shortcut Using Right-Click Drag and Drop:
- Open File Explorer: Launch File Explorer by pressing Win + E or by clicking the File Explorer icon on the taskbar.
- Navigate to the Item: Locate the file or folder for which you want to create a desktop shortcut.
- Right-Click and Drag: Press and hold the right mouse button on the selected file or folder.
- Drag to Desktop: While holding the right mouse button, drag the item to an empty area on your desktop.
- Release and Select “Create shortcuts here”: Release the right mouse button. A context menu will appear at the location where you released the button. From this menu, select “Create shortcuts here”.
A shortcut to the dragged item will be instantly created on your desktop. This drag-and-drop approach is efficient and intuitive, especially when managing files and folders within File Explorer.
Method 4: Drag and Drop from the Start Menu
The Start Menu in Windows 11/10 provides another avenue for creating desktop shortcuts, especially for applications listed within the Start Menu. This method is convenient for quickly placing shortcuts for installed programs directly onto your desktop.
Steps to Create a Shortcut from the Start Menu:
- Open the Start Menu: Click the Start button or press the Win key to open the Start Menu.
- Access “All apps”: Click on “All apps” to view the list of installed applications.
- Locate the Application: Scroll through the list or use the search bar to find the application for which you want to create a shortcut.
- Drag and Drop to Desktop: Click and hold the left mouse button on the application icon in the Start Menu. Drag the icon to an empty area on your desktop and release the mouse button.
A shortcut to the selected application will be created on your desktop. This method is particularly useful for quickly accessing programs that are readily available in the Start Menu.
Method 5: Drag and Drop with the Alt Key from File Explorer
For an alternative drag-and-drop method, you can utilize the Alt key in conjunction with the left mouse button. This method provides a distinct way to create shortcuts when dragging items from File Explorer.
Steps to Create a Shortcut Using Alt Key Drag and Drop:
- Open File Explorer: Launch File Explorer using Win + E.
- Navigate to the Item: Locate the file, folder, or program for which you want to create a shortcut.
- Press and Hold Alt Key: Press and hold down the Alt key on your keyboard.
- Left-Click and Drag: While holding the Alt key, click and hold the left mouse button on the selected item.
- Drag to Desktop: Drag the item to an empty area on your desktop.
- Release Mouse Button: Release the left mouse button (you can then release the Alt key).
A shortcut to the selected item will be created on your desktop. Using the Alt key during drag and drop is a less commonly known but effective method for shortcut creation.
Customizing Shortcut Icons
Once you have created a desktop shortcut, you can further personalize it by changing its icon. Customizing icons can make your desktop more visually organized and help you quickly identify shortcuts.
Steps to Change a Shortcut Icon:
- Right-Click the Shortcut: Right-click on the desktop shortcut whose icon you want to change.
- Select Properties: From the context menu, click on “Properties”.
- Navigate to the Shortcut Tab: In the Properties window, ensure you are on the “Shortcut” tab.
- Click “Change Icon”: Click the “Change Icon…” button.
- Choose a New Icon: In the “Change Icon” dialog box, you can select from a list of system icons. Alternatively, you can click “Browse…” to locate and select an icon file (.ico) from your computer.
- Click OK and Apply: After selecting your desired icon, click “OK” in the “Change Icon” dialog box. Then, click “Apply” and “OK” in the Properties window to apply the icon change.
Your shortcut will now display the new icon you selected. Customizing icons is a simple yet effective way to personalize your desktop environment.
Beyond Basic Shortcuts: Advanced Shortcut Capabilities
Creating basic shortcuts is just the beginning. Windows shortcuts can be used for a variety of advanced functions to further enhance your productivity.
Creating Shortcuts for System Commands and Special Functions
You can create shortcuts for system commands like shutdown, restart, log off, and even more specialized actions like clearing the clipboard or switching user accounts. These shortcuts streamline system management tasks.
Creating Shortcuts for Websites and Web Pages
Shortcuts are not limited to local files and applications. You can easily create shortcuts for frequently visited websites directly on your desktop. This provides instant access to web resources without needing to open a browser and type in the URL.
Creating Shortcuts to Open Multiple Items Simultaneously
For power users, it’s possible to create a single shortcut that opens multiple applications or web pages at once. This can be achieved through batch scripts or specialized shortcut creation tools, allowing you to launch a suite of programs or websites with a single click.
Conclusion
Mastering the art of creating desktop shortcuts in Windows 11/10 significantly enhances your computer usage efficiency. From basic application shortcuts to advanced system command shortcuts, the methods outlined in this guide provide a comprehensive toolkit for customizing your desktop environment. By utilizing these techniques, you can streamline your workflow, save valuable time, and personalize your Windows experience to meet your specific needs.
What are your favorite types of desktop shortcuts to create? Share your tips and tricks in the comments below!
Post a Comment