Windows 11 Audio Control: Master Muting and Unmuting Like a Pro
In Windows 11 and Windows 10, managing your audio is a fundamental aspect of user experience. While adjusting volume levels for individual applications and devices is common practice, there are many situations where you simply need to silence or restore sound quickly without altering your preferred volume settings. This ability to efficiently mute and unmute the sound volume provides convenience and control over your system’s audio output. This guide will walk you through several straightforward methods to mute or unmute sound volume on your Windows 11/10 PC, empowering you to manage audio like a professional.
Whether you need to silence notifications instantly, pause audio during a call, or restore sound after a temporary interruption, Windows offers multiple pathways to achieve this. These methods range from quick keyboard shortcuts to accessing dedicated audio control interfaces within the operating system. Understanding these different options allows you to choose the most suitable method for your current task and workflow. We will delve into eight distinct ways to control your sound volume’s mute state.
Here are the methods we will explore:
- Using Keyboard Shortcuts
- Via the Volume Icon on the Taskbar
- Through the Volume Mixer Utility
- Leveraging the Game Bar Interface
- Utilizing the Settings Application
- Exploring Advanced Sound Options
- Accessing Controls via the Control Panel
- Using the Windows Mobility Center
Each method offers a slightly different approach and level of control, catering to various user preferences and scenarios. Let’s examine each one in detail, providing step-by-step instructions to help you master audio muting and unmuting on your Windows system.
1] Using Keyboard Shortcuts
One of the fastest ways to mute or unmute your system’s sound volume is by using a dedicated key on your keyboard. Many modern keyboards, particularly those designed for multimedia use or laptops, feature specific keys for volume control, including a mute toggle. This method is incredibly convenient as it allows for instantaneous action without needing to interact with the software interface on your screen.
Locate the designated Mute key on your keyboard. This key is often found among the function keys (F1 through F12) or near the volume up and down keys. Pressing this key once will toggle the system’s master volume between its current level and a muted state. Pressing it again will restore the volume to its previous level before it was muted. The exact key icon and location may vary depending on your keyboard manufacturer and model, but it is typically represented by a speaker icon with or without a slash through it. Consult your keyboard’s documentation if you cannot locate the mute key. This method provides a universal mute/unmute function for the entire system audio output.
2] Via the Volume Icon on the Taskbar
The volume icon located in the notification area of the taskbar is perhaps the most commonly used method for adjusting volume, and it also provides a quick way to mute or unmute sound. This icon offers visual feedback on your current volume level and mute status, making it an intuitive option for managing audio. It’s readily accessible from almost anywhere within the Windows environment.
Clicking on the speaker icon in the taskbar will reveal a flyout slider that controls the master system volume. To mute or unmute the sound, simply click directly on the speaker icon located to the left of the volume slider within this flyout panel. The icon will change its appearance (often showing a red circle with a line) to indicate that the sound is muted. Clicking it again will revert the icon and unmute the volume. This method controls the master volume output for your currently selected playback device. If you have multiple audio output devices connected, like speakers and headphones, you might see an upward-pointing arrow (chevron) above the slider. Clicking this chevron allows you to select the specific playback device you want to control, and you can then click the speaker icon next to that device name to mute only that specific output device. This provides granular control over which audio hardware is affected.
3] Through the Volume Mixer Utility
For more precise control over the volume of individual applications and system sounds, the Volume Mixer is an invaluable tool. This utility allows you to see and control the audio levels for each running application, as well as the main system sound device. Accessing the Volume Mixer is straightforward and provides a clear overview of where your sound is originating from.
To open the Volume Mixer, right-click on the volume icon in the taskbar notification area. From the context menu that appears, select “Open Volume Mixer.” This will launch a dedicated window displaying sliders and icons for various audio sources. You will typically see a slider for your default playback device (system sounds) and separate sliders for applications that are currently producing sound, such as web browsers, media players, or games. Below each volume slider in the Volume Mixer, you will find a small speaker icon. Clicking this speaker icon will toggle the mute state specifically for that audio source (either the system sounds or the individual application). Clicking it again will unmute the sound for that source. Muting the main system volume device will effectively mute all sounds globally, while muting an individual app only silences that specific program, leaving other sounds unaffected. This is particularly useful when you want to silence a noisy app without muting your entire system.
4] Leveraging the Game Bar Interface
Windows Game Bar, accessible via a simple keyboard shortcut, is designed primarily for gamers but also includes useful widgets for general system control, including audio. If you’re in a game or even just using your PC, the Game Bar provides a quick overlay to access various settings without leaving your current application. Its audio widget offers control over system and application volumes, including mute functionality.
To activate the Game Bar, press the Windows key + G simultaneously. This keyboard combination will bring up the Game Bar overlay on your screen. Within the Game Bar, locate the “Audio” widget. If the Audio widget is not visible, you may need to open the Widget Menu (usually represented by an icon with multiple squares or dots) and select “Audio.” The Audio widget in the Game Bar lists various audio outputs and inputs, as well as individual applications producing sound. Similar to the Volume Mixer, each audio source listed in the Audio widget will have a speaker icon next to its volume slider. Clicking on this speaker icon will toggle the mute state for that specific device or application. After adjusting the audio settings as needed, simply click anywhere outside the Game Bar overlay or press Windows key + G again to dismiss it. This method is especially convenient when you want to quickly adjust audio during fullscreen applications like games or videos.
5] Utilizing the Settings Application
The Windows Settings app provides a more organized and detailed interface for configuring various aspects of your system, including sound. While accessing sound settings here might take a few more clicks than the taskbar icon, it offers a comprehensive view of your audio devices and allows for mute control of the selected output device. This method is useful when you are already navigating through system settings or prefer a centralized configuration interface.
To access sound settings via the Settings app, press the Windows key + I to open the Settings window. Alternatively, you can open the Start Menu and click on the “Settings” icon (shaped like a gear). In the Settings window, click on “System.” In the left-hand pane of the System settings, click on “Sound.” The right-hand pane will display your system’s sound settings. Scroll down to the “Output” section. Under “Choose your output device,” make sure the desired audio playback device is selected from the dropdown menu. Below the device selection, you will see the volume slider for that specific output device. Click on the speaker icon next to the volume slider to toggle the mute status for this device. When muted, the icon will change, and the slider will likely appear greyed out or have a mute symbol. Exit the Settings app when you are finished adjusting the volume. This method controls the master volume for the currently selected output device and is part of the modern Windows configuration experience.
6] Exploring Advanced Sound Options
For even finer control over application-specific audio routing and volume preferences, Windows provides “Advanced sound options,” accessible through the Settings app. This area allows you to set default output and input devices on a per-app basis and adjust their individual volumes or mute states. It’s a powerful tool for customizing your audio environment.
To reach these options, open the Settings app by pressing Windows key + I. Navigate to “System” and then “Sound,” similar to the previous method. In the Sound settings page, scroll down until you find the “Advanced” section. Click on “App volume device preferences.” This will open a new page or section within the Settings app listing currently active applications that are using audio, along with your system’s default output and input devices. For each application or the system default, you will see a volume slider and a speaker icon. Click the speaker icon next to any listed application or the system default to toggle its mute status independently. This allows you to silence specific apps while others continue to play sound, or ensure an app plays sound even if the main system volume is low (though it won’t exceed the system limit). This advanced view is excellent for troubleshooting or setting up complex audio configurations where different apps need different volume behaviors. Once done, simply close the Settings window.
7] Accessing Controls via the Control Panel
The traditional Windows Control Panel, while gradually being superseded by the Settings app, still offers comprehensive access to system configurations, including sound settings. This method provides a more classic interface for managing audio devices and their properties, including the ability to mute the main playback device. It’s a familiar route for long-time Windows users and offers access to device-specific levels and settings.
To open the classic Sound settings dialog via the Control Panel, you can use the Run command. Press Windows key + R to open the Run dialog box. Type mmsys.cpl and press Enter or click OK. This command directly opens the Sound dialog box. Alternatively, you can navigate through the Control Panel by searching for it in the Start Menu, changing the view to “Large icons” or “Small icons,” and clicking on “Sound.” In the Sound dialog box, go to the “Playback” tab. This tab lists all your audio output devices. Double-click on the default playback device (indicated by a green checkmark) or the device you wish to control, or select it and click the “Properties” button. In the device properties window, go to the “Levels” tab. Here, you will see a volume slider for the device and a speaker icon next to it. Click this speaker icon to toggle the mute state for that specific playback device. A red circle with a line through the icon indicates it’s muted. Click OK to apply the change in the device properties, and then OK again to close the Sound dialog box.
8] Using the Windows Mobility Center
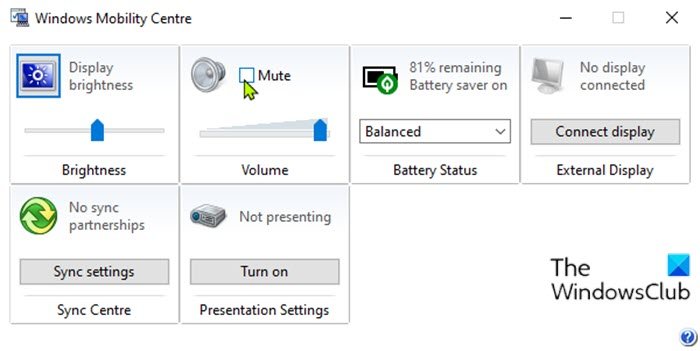
The Windows Mobility Center is a tool particularly useful for laptop users, providing a central location to access common mobile-related settings like brightness, volume, battery status, and wireless network connectivity. While its primary audience is mobile users, it is also available on some desktop systems and offers a quick tile to control the system volume’s mute state.
To open the Windows Mobility Center, press the Windows key + R to open the Run dialog. Type mblctr and press Enter or click OK. This will launch the Windows Mobility Center window. Within the Mobility Center, you will find several tiles representing different system settings. Locate the “Volume” tile. This tile typically shows the current volume level and includes a checkbox labeled “Mute.” To mute the system volume, simply check the “Mute” box within this tile. To unmute, uncheck the box. There is also usually a slider in this tile to adjust the volume level directly. The Mobility Center provides a straightforward, tile-based interface for controlling the master system volume mute status, making it easily accessible for users who frequently adjust these settings on the go. Once you’ve made your adjustment, you can simply close the window.
| Method | Ease of Access | Control Level | Primary Use Case |
|---|---|---|---|
| Keyboard Shortcut | Very Easy | System Master | Instant, global mute/unmute |
| Taskbar Icon | Easy | System/Device | Quick adjustment, device selection |
| Volume Mixer | Moderate | System & App | Per-application volume/mute control |
| Game Bar | Easy (via Win+G) | System & App | In-game/fullscreen control, app focus |
| Settings app | Moderate | Selected Device | Detailed device configuration |
| Advanced Sound Options | Moderate | System & App | Per-application device routing/volume |
| Control Panel (Sound) | Moderate | Selected Device | Traditional device properties access |
| Windows Mobility Center | Moderate (via Run) | System Master | Quick access for mobile settings |
These eight methods provide a comprehensive toolkit for managing the mute and unmute state of your sound volume in Windows 11/10. Whether you prefer the speed of a keyboard shortcut, the convenience of the taskbar icon, or the granular control of the Volume Mixer or Advanced Sound Options, Windows offers a solution that fits your needs. Experiment with each method to discover which one best integrates with your daily workflow and provides the control you require over your system’s audio.
Do you have a preferred method for muting and unmuting sound on your Windows PC, or perhaps a tip we didn’t cover? Share your thoughts and experiences in the comments below!
Post a Comment